HP Broadcom iSCSI Boot for NC37xx/NC380x Adapters User Guide Part Number 519430-004 December 2010 (Fou rth Edition)
© Copyright 2009, 2010 Hewlett-P ackard Development Company, L.P. The information contained herein is subject to change without notice. The only warranties for HP products and services are set forth in the express warranty statements accompanying such products and services. Nothing herein should be construed as constituting an additional warranty. HP shall not be liable for technical or editorial errors or omissions contained herein. Confidential computer software.
Contents Overview ....................................................................................................................... 4 iSCSI boot for Windows overview............................................................................................................. 4 Accelerated iSCSI Boot .................................................................................................................. 4 Limitations .............................................................................
Overview iSCSI boot for Windows overview The HP iSCSI boot feature allows a server to boot from a remote disk that supports M icrosoft iSCSI Software Initiator (known a s the iSCSI ta rget) on a Storage Area Network (SAN) without having to directly attach a boot disk. Booting from a remote d isk on a SAN allows the boot process to be centralized and consolidates equipment resou rces. Unlike other implementations, iSCSI b oot d oes not require a separate DHCP server or a PXE server.
• Windows Server 2008 x64 • Windows Server 2003 (SP2 or later) • Windows Server 2003 x64 (SP2 or later) Supported hardware • Servers. ProLiant servers (ML, DL, and BL p-Class or c-Class) that include an iLO (integ rated Lights Out) or RILOE (remote insight lights-out edition) management devices with a minimum of 512 M B memory with any of the supported operating systems. • Adapters. The following Multifunction G igabit Server Adapters are supported.
Installation and configuration Downloading the SoftPaq 1. Go to the HP website (http://www.hp.com/#Support). 2. Click Support & Drivers. 3. Select Download drivers and software (and firmware). 4. Type the adapter name in the For product box, and then click Go. 5. Select an operating system. 6. Click HP NC-Series Broadcom iSCSI Boot Package for Windows. 7. Click download and save the HP SoftPaq (sp#####.exe) file to a directory on your hard drive.
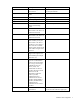
Variable name Description Exam ple TargetName Name of the target from which to boot TargetName=iqn.200305.com.hp1510i:disk01 TargetIP Target IP in aaa.bbb.ccc.ddd format TargetIP=10.10.10.20 TargetPort Target Port, generally 3260 TargetPort=3260 TargetIP2 Secondary TargetIP TargetIP2=10.10.20.20 TargetPort2 Secondary Port TargetPort2=3260 InitiatorName Name used for the iSCSI initiator on the booting system. InitiatorName=iqn.
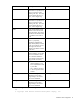
Variable name Description Exam ple CHAPSecret CHAPSecret=password1234 Secret password for CHAP authentication. Specified as a string or a long hex value (starting with "0x"). This value must be at least 96 bits (12 bytes, 24 hex digits) long. CHAPMSecret CHAPMSecret=anotherpassword Secret password for CHAP authentication. Specified as a string or a long hex value (starting with "0x"). This value must be at least 96 bits (12 bytes, 24 hex digits) long.
# All Rights Reserved # 02/30/08 jpd. For 1.2.2 NC37x iSCSI BIOS # # Consult the IETF iSP iSCSI for details of these items. # ## # Name of the iSCSI Target. Must match what the target offers. # Hard coded Target IP .. No DNS support # TargetName=iqn.2003-05.com.hp1510i:disk01 TargetIP=10.10.10.13 TargetIP2=10.10.20.13 ## # local name the iSCSI client will present to the Target # and local IP settings. No DNS or DHCP support # InitiatorName=iqn.client01 InitiatorIP=10.10.10.02 InitiatorNetmask=255.255.255.
DataDigest=False HeaderDigest=False ## Account Login information # . The AuthMethod values are: None,CHAP, and (TwoWay) MutualCHAP, # AuthMethod=None CHAPUsername=iqn.1991-05.com.microsoft:comfort.txn.cpqcorp.net CHAPSecret=Some12day123 CHAPMSecret=BetterThanThat 3. Write the boot path to the target server. After you edit the EVINPUT.TXT file, write the boot path to the target server with the EV.EXE DOS utility using the following command. ev -c < evinput.
iSCSI boot option ROM must be enabled before it can be used. Do not enable iSCSI b oot on more than two adapters because option ROM space is limited. The following sections describe procedures to enable iSCSI boot for embedded adapters, standup adapters, and mezzanine adapters. 1. Enable iSCSI boot for Em bedde d adapters—The iSCSI b oot option ROM can be enabled for embedded adapters using the RBSU tool that is built into the system ROM. a. During the boot press F9 to enter the RBSU. b.
Boot Controller Order c. Change the order so that the iSCSI boot adapter is listed first. d. Press escape to exit RBSU. If the network adapter does not appear in the Boot Controller Order list, you r System ROM d oes not support this feature. If the System ROM is up to date, it is necessary to override the Boot Controller Order list b y setting EV parameter "ForceBoot=True".
peimg /inf=. HPNicUpdate\drivers\bxois.inf/image=. \HPNicUpdate\MountPoint\Windows 12. Save the changes to the WIM using the following command: imagex/unmount/commit.\HPNicUpdate\MountPoint 13. Replace the original sources\boot.wim image (located in the W2K8 DVD f older you created in an earlier step) with the HPNicUpdate\Wim\boot.wim image and then create a new DVD image.
3. o For a Wind ows 2003 x86 operating system, navigate to the apps\bcm_iscsi\nc37x\x86\disk2 directory and cop y all files to the root directory of disk 2. o For a Wind ows 2003 x64 operating system, navigate to the apps\bcm_iscsi\nc37x\x64\disk2 directory and cop y all files to the root directory of disk 2. Customize the Wind ows 2003 SP2 installation CD b y creating a slipstream version that includes the Microsoft Storport hotfix KB943295 (http://support.microsoft.com/kb/943295).
5. Select drivers from the disk 1 and disk 2 diskettes when prompted. DO NOT insert d isk 1 into drive A until prompted. After disk 1 is inserted, the following window appears. 6. Select Specify Additional Device. The following window appears.
7. Press Enter to continue. The following window appears. 8. Complete the f ollowing steps to install the first three files. a. Select Install 1st: MS Windows wdfldr and then press Enter. b. Select Install 2nd: HP Windows wdf01000 and then press Enter. c. 9. Select Install 3rd: HP NC37x/NC380 Virtual Bus Driver and then press Enter. Insert disk 2 and press Enter when the following window appears.
10. Press Enter to install the 4th file: HP iSCSI HBA Driver. 11. A Windows setup screen shows the iSCSI Target.
12. Windows formats the iSCSI target and then begins copying files to the iSCSI target. During this phase a secondary setup may appear prompting for d isk 1 and disk 2 again. 13. If the following window appears, insert disk 1 and press Enter. 14. If the following window appears, insert disk 2 and press Enter. Windows Server 2003 continues installing on the iSCSI target. Post installation procedures After the CD installation, complete the following steps. 1.
2. Install all HP software components for network adapters. 3. Install the Microsoft crash dump driver (KB943295 (http://support.microsoft.com/kb /943295)), which enables obta ining Crash dumps. 4. Install the Microsoft iSCSI Initiator component (optional). 5. Install the HP Network Configuration Utility. 6. Configure HP license components if required. Install Microsoft iSCSI Software Initiator 1. Launch the Microsoft iSCSI Software Initiator 2.
Troubleshooting Known issues Known issues for Microsoft iSCSI Initiator boot installation • If you do not select an Adapter Service Name by highlighting it during initial Microsoft Initiator b oot setup, the setup continues without an error but does not select an NDIS driver for booting. The deployed system will display a stop error or Blue Screen of Death (BSoD) on boot prior to the first splash screen.
Target login problems Symptoms: The iSCSI initiator is able to connect to the ta rget but is unable to log in successfully.
The initiator is able to connect to and log in to the ta rget and the system recognizes the disk but you are unable to install the operating system.
Technical support Before you contact HP Be sure to have the following information available before you call HP: • Technical support registration number (if applicable) • Product serial number • Product model name and number • Product identification number • Applicable error messages • Add-on boards or hardware • Third-party hardware or software • Operating system type and revision level HP contact information For the name of the nearest HP authorized reseller: • See the Contact HP worldwi
Acronyms and abbreviations BSOD blue screen of death CHAP Challenge Handshake Authentication Protocol DHCP Dynamic Host Conf iguration Protocol HBA host bus adapter iLO Integrated Lights-Out iLO 2 Integrated Lights-Out 2 IPL initial program load iSCSI Internet Small Computer System Interface LAA locally administered address LUN logical unit number PDU protocol data unit PXE Preboot Execution Environment Acronyms and abbreviations 24
RBSU ROM-Based Setup Utility RILOE Remote Insight Lights-Out Edition SAN storage area network UNDI Universal Network Driver Interface VLAN virtual local-area network WIM Windows Imaging file format Acronyms and abbreviations 25
Index A O accelerated iSCSI 4 OS problems 21 overview 4 B booting problems 21 C CHAP 6, 21 crash dump 19 D diagnostic tools 20 discovery protocols 4 downloading files 6, 23 P Post installation 18 problem diagnosis 20 PXE (preboot execution environment) 10, 21 R RBSU (ROM-Based Setup Utility) 10 required softwa re 4 S F6 install 13 firmware update 6 SAN configuration 4 slipstream CD 19 support 23 supported adapters 4 supported operating systems 4 supported servers 4, 6, 12, 19, 20, 21 supported t