HP Integrity Servers with Microsoft® Windows Server™ 2003 and Windows Server™ 2008 for Itanium-Based Systems Configuring an Embedded 1068 Controller as the Boot Controller on HP BL860c and BL870c Blade Servers HP Part Number: 5992-4511 Published: September 2008
© Copyright 2008 Hewlett-Packard Development Company, L.P. Legal Notices Confidential computer software. Valid license from HP required for possession, use or copying. Consistent with FAR 12.211 and 12.212, Commercial Computer Software, Computer Software Documentation, and Technical Data for Commercial Items are licensed to the U.S. Government under vendor's standard commercial license. The information contained herein is subject to change without notice.
Table of Contents About This Document.........................................................................................................5 Intended Audience.................................................................................................................................5 New and Changed Information in This Edition.....................................................................................5 Document Organization.....................................................................
List of Figures 1-1 1-2 1-3 1-4 1-5 1-6 1-7 1-8 1-9 1-10 1-11 1-12 1-13 1-14 1-15 1-16 1-17 1-18 1-19 1-20 1-21 1-22 4 EBSU Welcome screen.....................................................................................................................7 EBSU Main menu............................................................................................................................8 EBSU Choose Adapter screen.......................................................................................
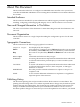
About This Document This document describes how to configure an embedded 1068 controller as the system boot controller on HP BL860c and BL870c servers running Microsoft Windows Server 2003 or Windows Server 2008. Intended Audience This document is intended for system administrators and HP support personnel responsible for installing, configuring, and managing HP Integrity servers. This document is not a tutorial. New and Changed Information in This Edition The is the second release of this document.
subscribe to the appropriate product support service. See your HP sales representative for details. You can find the latest version of this document on line at: http://www.docs.hp.com Manufacturing Part Number Supported Operating Systems Supported Versions 5992–4511 Microsoft® Windows Version 6.
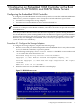
1 Configuring an Embedded 1068 Controller as the Boot Controller on HP BL860c and BL870c Blade Servers Configuring the Embedded 1068 Controller To configure your embedded 1068 controller as the system boot controller on BL860c and BL870c blade servers, you must complete a series of steps that can be divided into 2 procedures: • Procedure #1: Configure the storage adapters • Procedure #2: Load the OEM boot driver and install Windows NOTE: The DVD-ROM drive described in the following steps must be an external
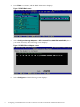
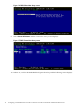
4. Press Enter to continue, and the EBSU Main menu displays. Figure 1-2 EBSU Main menu 5. Select Configure Storage Adapters > HP 8 Internal Port SAS HBA with RAID (this is your 1068 controller). The following screen displays. Figure 1-3 EBSU Choose Adapter screen 6. 8 Select Configure and the following screen displays.
Figure 1-4 EBSU screen 7. Press Enter, and the Adapter Properties screen displays. Figure 1-5 EBSU Adapter Properties screen 8. Scroll down to the Boot Support row and select Enabled BIOS & OS. Then select RAID Properties and the following screen displays.
Figure 1-6 EBSU Select New Array screen 9. Select Create IM Volume and the Create New Array screen displays. Figure 1-7 EBSU Create New Array screen 10. In Row #1, scroll to the RAID Disk field, press the + key, and the following screen displays.
Figure 1-8 EBSU Create New Array Data screen 11. Press D to select Overwrite existing data. The create New Array screen returns. You should see the word “Yes” in the Raid Disk field for Disk #1. Figure 1-9 EBSU Create New Array screen 12. Repeat Step 10 and 11 for Disk #2 (in Row #2). When you are finished, in the Create New Array screen, the word “Yes” should appear in the RAID Disk fields for both disks.
Figure 1-10 EBSU Create New Array screen 13. Press C to create the new array, and the following screen displays. Figure 1-11 EBSU Save Array screen 14. Select Save changes then exit this menu. During the array configuration process you will see this message: Processing... may take up to 1 minute. Creating RAID array... When the new array is created, the following screen displays.
Figure 1-12 EBSU Adapter Properties screen 15. Select RAID Properties to confirm the new RAID array, and the following screen displays. Figure 1-13 EBSU View Array screen 16. Press the Esc key (Escape) and the following screen displays.
Figure 1-14 EBSU Adapter Properties screen 17. Press the Esc key again. Figure 1-15 EBSU screen 18. Press the Esc key one more time.
Figure 1-16 EBSU screen 19. Select Exit the Configuration Utility and Restart to return back to the EBSU Main menu. Procedure #2: Load the OEM Boot Driver and Install Windows To load the OEM boot driver and install Windows, complete the following steps: 1. 2. Boot the server with your Smart Setup media in the DVD-ROM drive. It may take a minute or two for the disk to initialize, so please be patient.
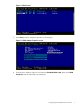
Figure 1-18 EBSU Main menu 5. Select Load OEM Boot Driver and the following screen displays. Figure 1-19 EBSU Load OEM Boot Driver screen 6. 16 Select HP Internal SAS (this is your 1068 controller). Then select Load. The following screen displays.
Figure 1-20 EBSU Load OEM Boot Driver screen 7. 8. Press Enter to return back to the EBSU Main menu. Exit EBSU and insert your Smart Setup media in the DVD-ROM drive to start the Windows installation process (do not press the F6 key at any time, even if prompted). Eventually the following screen displays. Figure 1-21 Windows Welcome screen 9.
Figure 1-22 Windows Setup screen 10. Windows recognizes the new RAID array. Installation of the operating system should now proceed to completion.