Connecting Your HP SureStore CD-Writer Plus Drive Windows 95 and Windows NT 4.0 R U.S.: Hewlett-Packard Company, 815 SW 14th Street Bldg. E., Loveland, CO 80537 Europe: Hewlett-Packard Nederland B.V., P.O. Box 58144, 1040 HC Amsterdam, The Netherlands C4358-90100 Rev. B Copyright 1997. Hewlett-Packard Company. All rights reserved. Hewlett-Packard is a registered trademark of Hewlett-Packard Company. Microsoft and Windows are U.S. registered trademarks of Microsoft Corporation. Pentium is a U.S.
ii Copyright notice for Denmark: VIGTIGT! Copyright ved brug af CD-Writer 7100i/e enheder solgt i Danmark I henhold til gældende dansk lov om ophavsret er det forbudt at foretage digital kopiering af et digitalt værk. CD-RW brænderen må derfor IKKE anvendes til at kopiere en musik-CD.
Table of Contents Table of Contents . . . . . . . . . . . . . . . . . . . . . . . . . . . . . . . . . . .iii Before You Start . . . . . . . . . . . . . . . . . . . . . . . . . . . . . . . . . . . . 1. Whats in Your Package . . . . . . . . . . . . . . . . . . . . . . . . . . . . . . . . . . . . . . .1 Connecting the CD-Writer drive . . . . . . . . . . . . . . . . . . . . . . . 2 . If You Have Problems... . . . . . . . . . . . . . . . . . . . . . . . . . . . . . . . . . . . . . . .
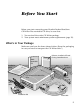
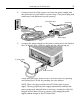
Before You Start Before you start connecting your Hewlett-Packard SureStore CD-Writer Plus rewritable CD drive, be sure that: 1. You received the entire CD-Writer package. 2. Your system meets minimum system requirements (page 32). Whats in Your Package Make sure you have the items shown below. (Keep the packaging in case you need to transport the CD-Writer drive.
Connecting the CDWriter drive CAUTION: The CD-Writer drive contains sensitive, high-precision optical equipment. Dropping or shaking the CD-Writer drive may cause damage to these sensitive components. Please be careful when handling your drive. NOTE: Refer to the manual that came with your computer if you need more information than what is provided here. WARNING: DO NOT, under any circumstances, open the external CDWriter drives case.
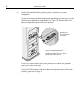
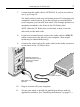
3 Connecting the CD-Writer drive 2. Connect one end of the power cord into the power supply and the other end to a wall outlet or power strip. (The power plug and outlet may look different in your country.) To CD-Writer drive Green light power cord Power supply 3. Connect the power supply to the power connector on the back of the CD-Writer drive, with the arrow on the cable facing up.
4 Installation Guide 4. Locate the parallel port (printer port) connector on your computer. If you are having trouble finding the parallel port connector, your printer may already be attached to it. The CD-Writer drive can share the parallel port with your printer. Parallel ports have receptacles for 25 pins. Select an available parallel port. TIP: Your CD-Writer drive can share a parallel port with a printer. If the CD-Writer drive and your printer will share the parallel port, go to the next step.
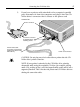
5 Connecting the CD-Writer drive 5. If you have a printer cable attached to the computers parallel port, disconnect it from the computer and plug it into the CDWriter drives connector that is closest to the power cord connector. Printer connector Secure the connector by tightening the retaining screws. Printers data cable (If a printer is sharing the parallel port with the CDWriter drive.
6 Installation Guide 6. Attach the CD-Writer drives data cable to your computers 25pin parallel port connector and hand tighten the retaining screws. Attach the data cables remaining connector to the rewritable drive and secure it by tightening the retaining screws. Attach this end to the computers parallel port. Attach this end to the CDWriter drive.
7 Connecting the CD-Writer drive 7. Connecting the audio cable is OPTIONAL. If you do not wish to use it, go to step 10. The audio cable is used only for hearing music CDs through your computers sound system. If you do not have a sound board in your computer, you can still hear music CDs through speakers or earphones attached to the front of the CD-Writer drive. NOTE: When the CD-Writer drive records music or data, it uses the data cable, not the audio cable. 8.
8 Installation Guide If You Have Problems... After connecting your CD-Writer drive and turning on your computer, the computer should start (boot) as it normally does. If it does not, check the following items: ■ Is the computer power plugged in? ■ Is each device plugged in and turned on? ■ ■ Are all cables properly plugged into the back of your computer and the CD-Writer drive? Try turning off your computer. Wait at least 20 seconds before turning it back on.
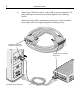
Connecting the CD-Writer drive 2. 9 Unplug the CD-Writers power supply from the outlet or power strip. Power supply NOTE: There is no power switch on the CD-Writer drive or power supply. You may safely unplug the power supply without damage to the CD-Writer drive. (The power plug and outlet may look different in your country.) 3. Disconnect the data cable and audio cable (if any) from the back of the computer.
10 Installation Guide 4. Disconnect the printer cable (if any) from your CD-Writer drive and reconnect it to the back of your computer (other cables not shown but still attached). 5. You are ready to connect the CDWriter drive to another computer. To connect the CD-Writer drive to another computer: 1. Follow the directions for Connecting the CD-Writer drive on page 2. 2. The first time you attach the CD-Writer drive to this computer, follow the directions for Installing the Software on page 11.
Installing the Software After the CD-Writer drive is attached to your computer, you are ready to install the application software. NOTE: You must run the installation program. The installation program converts the files from the Software Installation CD into a usable format. 1. Insert the CD labeled Software Installation into your CD-ROM drive (not the CD-Writer drive), if you have not already done so.
12 Installation Guide 2. If the language-selection screen doesnt automatically appear, click on the Start button on the task bar, select Run, type D:\SETUP (where D: is your CD drives letter), then click onOK. The following screen appears: 3. Select the desired language or leave the default. Click onNext. 4. Click on the Install Software button on this menu: Click here to install the software . Click here for a fun multimedia tour of the programs that came with your drive.
Installing the Software 13 5. The parallel-driver files are installed first. This may take several minutes and your mouse cursor will not move. (If you used the diskette, this step will be skipped.) 6. The Welcome window appears, click on Next. 7. The software license agreement window appears. After reading it, click on Yes. 8. The Setup window asks you to choose either acomplete or custom installation.
14 Installation Guide ■ ■ ■ 10. To install to a different directory, click theBrowse button and type the name of the directory into which you want to install the programs. To select the programs you wish to install, click on the check boxes. (A indicates that the program is selected.) Click on Next to install the programs. The programs are installed, one at a time. When all files are installed: ■ ■ You are prompted to fill out the electronic registration.
Installing the Software 15 Identifying the CD-Writer drive Not sure which drive letter was assigned to the CDWriter drive? The CD-Writer drive will have a drive icon just like a CD-ROM drive icon. You can determine which icon is your CDROM drive and which icon is your CD-Writer drive by doubleclicking on the My Computer icon, right-click on the CD drive icon, and select Eject. The tray of the selected drive will open.
16 Installation Guide ■ ■ If you have a printer connected to the CD-Writer drive, check to see if your computer can detect the CD-Writer drive when the printer is disconnected. Check to make sure that your parallel port is truly configured as either EPP or ECP. Check the manual that came with your computer to find out how. Check for a conflict with the parallel port (some other device using the same IRQ or I/O as the parallel port).
Installing the Software 17 Error message when I double-click on the CD-Writer drives icon ■ ■ ■ ■ There is no CD in the CD-Writer drive; insert a CD and try again. After inserting a CD, you need to wait a moment to let the CD-Writer drive read the disc information (wait until the light on the front of the drive stops flashing and stays green), then click on the CD-Writer drives icon again. The CD may be in the tray upside-down or a little off-center; try reinserting the CD.
18 Installation Guide System does not recognize the CD-Writer drive ■ In Windows 95, simply click on the Connect or Disconnect external drive icon on your desktop. Select Shuttle EPAT External ATAPI Adapter , then click Disconnect . ■ ■ ■ ■ Restart your computer, or shut it down and then turn it on again. Watch for the green light on the front of the CD-Writer drive to blink as the computer boots up. Make sure the CD-Writer drives cables are connected properly.
Installing the Software 19 Uninstalling the Software Programs You can remove all CD-Writer drives programs or individual programs. CAUTION: If you want to reinstall the CD-Writer drives software, first be sure to uninstall the original software. 1. Click the Start button. ■ Highlight Programs. ■ Select CD-Writer drive . ■ Select Uninstall . 2. Select the CD-Writer drives program(s) that you wish to remove. 3. Click the Finish button.
Using CDs This section describes the use of the recordable and rewritable CDs. It shows you how to: 1. Insert and remove a CD 2. Purchase additional CDs 3. Maintain your CD-Writer drive Inserting a CD 1. Press the eject button on the CD-Writer front panel. 2. Set the CD in the tray with the labeled side up. Eject button 3. Press the eject button again or push gently on the front of the tray to shut the tray.
Using CDs ■ ■ 21 After inserting a CD, you need to wait a moment to let the CD-Writer drive read the disc information (wait until the light on the front of the drive stops flashing and stays green), then click on the CD-Writer drives icon again. Are you trying to read from a blank recordable CD? Try again after copying some information to the CD. Removing a CD 1. Press the eject button on the HP CD-Writer drive front panel. 2. Remove the CD from the tray. 3.
22 Installation Guide Purchase HP CD-RW (re-writable) media Available from your local vendor, these CDs can only be used with CD-Rewritable drives or read from newer MultiRead CDROMs: ■ 12 cm (650 MB, 74-minute) 1 pack (C4431A) ■ 12 cm (650 MB, 74-minute) 3 pack (C4431C) ■ 12 cm (650 MB, 74-minute) 25 pack (C4431D) NOTE: Do not mix audio and data files on the same CD since they require different formats.
Problem Solving Review this section first if you run into trouble using the programs that came with your CD-Writer drive. If you need further assistance, call the phone numbers listed in theSoftware Installation CDs Getting Started brochure. Gather the information on page 44 before calling for help.Having this information ready will greatly facilitate your call.
24 Installation Guide Common Symptoms and Solutions ■ ■ ■ ■ Not sure which drive letter was assigned to the CD-Writer drive? (see page 15) Error message when I double-click on the CD-Writer drives icon (see page 17) In Windows Explorer, unable to see the CD label or all the sessions/files on the CD (see page 17) Printer no longer works after connecting the CD-Writer drive (see page 17) ■ Problems printing a file (see page 17) ■ System does not recognize the CD-Writer drive (see page 18) ■ Copyi
Problem Solving 25 Copying directly from one CD to another doesnt work. WARNING: Only reproduce material for which you own the copyright or have obtained permission to copy from the copyright owner. Unless you own the copyright or have permission to copy from the copyright owner, you may be violating copyright law and be subject to payment of damages and other remedies. If you are uncertain about your rights, contact your legal advisor.
26 Installation Guide ■ Try listening to the .WAV files on your hard drive to see if they sounded poor before copying them to CD. (You can use the CD Player program in Windows Accessories.) Video is choppy This can be caused by the same situations that cause buffer underruns. This can also happen if your video card is slow. Try the following: ■ Try the solutions for buffer underruns (page 26). ■ Upgrade your video card.
Problem Solving ■ 27 Run SCANDISK.EXE and DEFRAG.EXE periodically on your hard drive (see your Windows manual for more information). These programs improve access times to the hard drive, which will help improve system performance while writing to and reading from the CD-Writer drive. Buffer underruns could also be caused by an unsupported parallel port (standard mode SPP). See Minimum System Requirements on page 32.
28 Installation Guide ■ ■ In Windows 95 only, to verify that you are using version 4.00.1111 or higher of the ESDI_506 file, start Explorer. Access Windows\System\Iosubsys. Look for the ESDI_506.pdr file. Right-click on the file name, select Properties, then select the Version tab to view the version number. Call Microsoft for an updated file if you need it. See if the CD-Writer drive or other CD-ROM drives can read the CD. If so, the problem is probably with the CD-ROM drive.
Problem Solving 29 Lost power to your computer or had to press CTRL-ALTDEL while writing to the CD! If you lose power while writing to your CD (the CD-Writer drive's Red Light is On) OR If you exit an application or press CTRL-ALTDEL while writing to CD... You may be able to salvage your CD, but ONLY if you: A. LEAVE YOUR CD IN THE DRIVE, DO NOT OPEN THE DISC TRAY B. turn your machine off C. turn it back on D.
30 Installation Guide Printer Status Monitor Software NOTE: This is only a problem if your printer is connected to the back of the CD-Writer drive. If your printer came with a program that notifies you about the status of the printer (such as when it is out of paper), thisprinter status monitor software might cause problems. The printer status monitor software checks the status of your printer every few seconds.
Problem Solving 31 such as the CD-Writer drive, to the parallel port will damage the port. Contact your computer manufacturer for more information. ■ ■ ■ IBM Aptiva computers Most have the parallel port configured to I/O base address 3BC. This must be changed, see "Minimum System Requirements" on page 32. Printers in General If your printer came with a program that notifies you about the status of the printer (such as when it is out of paper), this printer status monitor software might cause problems.
Technical Specifications Minimum System Requirements Your computer should meet or exceed these requirements: ■ IBM or compatible Pentium/75 Mhz processor ■ Microsoft® Windows 95® or Windows NT® 4.0 TIP: For Windows NT, we recommend Service Pack 2, Version 4.00.1381.
Technical Specifications ■ 33 Windows 95 only: ESDI_506 version 4.00.1111 To verify that you are using version 4.00.1111 or higher of the ESDI_506 file, start Explorer. Access Windows\System\Iosubsys. Look for the ESDI_506.pdr file. Right-click on the file name and select the Version tab to view the version number. Call Microsoft for an updated file if you need it.
34 Installation Guide SPP mode allows the CD-Writer drive to run at up to a 2x read speed and up to a 1x write speed if the other minimum system requirements are met. EPP and ECP modes allow the CD-Writer drive to run at up to a 6x read speed and a 2x write speed if the other minimum system requirements are met. TIP: Check your computers specifications to see which kind of parallel port was installed.
35 Technical Specifications programs improve access times to the hard drive, which will help improve system performance while writing to and reading from the CD-Writer drive. NOTE: Refer to your computer manual or contact your computer vendor if you have any questions about your computers configuration or capabilities.
36 Installation Guide Performance Buffer size: 750 kB Average access time (1/3 stroke): <325 ms Data transfer rate (recording): 150 KB/s sustained (1x speed) 300 KB/s sustained (2x speed) Data transfer rate (reading): 150 KB/s (1x speed) 300 KB/s (2x speed) up to 900 KB/s (6x speed) Error rate: < 1 frame/1012 bits Audio distortion: < 0.1% Interface Electrical interface: parallel port EPP/ECP Loading mechanism: tray Logical recording format (depending on application used): ISO 9660 UDF 1.
Technical Specifications 37 Product Certifications UL, cUL, TÜV, NOM, CE, meets or exceeds FCC Class B requirements Laser: CDRH on internal laser product Laser Safety This unit employs a laser. Do not remove the cover or attempt to service this device when connected due to the possibility of eye damage. Laser-Sicherheit In das Gerät ist ein Laser eingebaut. Nehmen Sie die Abdeckung nicht ab und versuchen Sie nicht, das Gerät zu reparieren, solange es angeschlossen ist.
38 Installation Guide FCC Declaration of Conformity According to 47CFR, Parts 2 and 15, Class B Computer Peripherals: This device complies with Part 15 of the FCC Rules. Operation is subject to the following two conditions: (1) this device may not cause harmful interference (2) this device must accept any interference received including interference that may cause undesired operations. This applies to all product options.
Technical Specifications 39 Federal Communications Commission R.F. Interference Statement WARNING: This equipment has been tested and found to comply with the limits for a Class B digital device, pursuant to Part 15 of the FCC Rules. These limits are designed to provide reasonable protection against harmful interference in a residential installation.
40 Installation Guide Users manual statement for VCCI class B product Translation for VCCI class B product This equipment is in the Class B category information technology equipment based on the rules of Voluntary Control Council For Interference by Information Technology Equipment (VCCI). Although aimed for residential area operation, radio interference may be caused when used near a radio or TV receiver. Read the instructions for correct operation.
41 Technical Specifications Hewlett-Packard Limited Warranty Statement HP SureStore CD-Writer Plus Drive DURATION OF LIMITED WARRANTY Hardware - 1 year Software - 90 days 1. HP warrants to you, the end-user customer, that HP hardware, accessories and supplies will be free from defects in materials and workmanship after the date of purchase, for the period specified above.
42 Installation Guide Software License Agreement ATTENTION: USE OF THE SOFTWARE IS SUBJECT TO THE HP SOFTWARE LICENSE TERMS SET FORTH BELOW. USING THE SOFTWARE INDICATES YOUR ACCEPTANCE OF THESE LICENSE TERMS. IF YOU DO NOT ACCEPT THESE LICENSE TERMS, YOU MAY RETURN THE SOFTWARE FOR A FULL REFUND. IF THE SOFTWARE IS BUNDLED WITH ANOTHER PRODUCT, YOU MAY RETURN THE ENTIRE UNUSED PRODUCT FOR A FULL REFUND. HP SOFTWARE LICENSE TERMS License Grant.
Technical Specifications 43 Returning a Drive All other countries except USA.If your Hewlett-Packard product requires repair or replacement, call Customer Support at the phone number listed in "Customer Support" on page 47 to receive instructions. In the USA. If your Hewlett-Packard product requires repair or replacement, follow these instructions: Call the number listed in "Customer Support" on page 47. Customer Support will help you determine if your drive is defective.
44 Installation Guide Before You Call Customer Support If your own troubleshooting efforts fail, contact Customer Support. For hardware problems see page 47, or for software problems see the phone numbers in the Software Installation CD Getting Started insert. Before you contact them, have the information below ready. For help finding this information, see page 45. If you receive an error message, write it down before you call.
Technical Specifications 45 Where to find this information CD-Writer drive model The CD-Writer drive model number appears on a sticker on the back of the CD-Writer drive, as well as on the box.Example: 3100i (internal) or 3100e (external) Drive firmware version In Windows 95 , the drive firmware version and model number (above) appear in the CD-ROM settings. Right-click on theMy Computer icon, select Properties , select the Device Manager tab, double-click on CDROM.
46 Installation Guide Operating system and amount of RAM installed In Windows 95 , from the Start menu on the task bar, select Settings/Control Panel . Double-click on System. Select the Performance tab. Write down the version number and the amount of memory installed; for example: 4.00.950 and 16 MB RAM. In Windows NT (while signed on as Administrator), from theStart menu on the task bar, select Programs/Administrative Tools (Common)/Windows NT Diagnostics .
Customer Support If you have questions about the HP VersaWriter CD drives software, call the numbers listed in the Getting Started brochure. If you need help with your HP VersaWriter CD drive, your local reseller has the latest information regarding HP products and services and can provide support under HP's comprehensive menu of reseller services.
48 Customer Support Asia/Pacific China . . . . . . . . . . . . . . . . . . . . . . . . . . . . . . . . . . . (8610) -65055280 Japan. . . . . . . . . . . . . . . . . . . . . . . . . . . . . . . . . . . . . . . (3) 3335-8622 Korea. . . . . . . . . . . . . . . . . . . . . . . . . . . . . . . . . . . . . . . (02) 769-0543 New Zealand. . . . . . . . . . . . . . . . . . . . . . . . . . . . . . . . . (09) 356 6642 Singapore . . . . . . . . . . . . . . . . . . . . . . . . . . . . . . . . . . .
Customer Support Asia/Pacific Australia (M-F 7am-7pm, Eastern Standard Time) . . . (03) 9272 8000 China (M-F 8:30-17:30) . . . . . . . . . . . . . . . . . . . . . (8610)-62625666 extensions 5602 through 5609, 5611 and 5612 (8610)-62614174 (8610)-62624175 (8610)-62614176 Korea (M-F, 8:30-19:00) . . (02) 3270-0700 / 080-999-0700 (toll free) New Zealand (M-F, 9am to 9pm Auckland Time) . . . . (09) 356 6640 Singapore (M-F, 9:00-17:00) . . . . . . . . . . . . . . . . . . . . .
Index A access time 27, 33, 35, 36 Acer brand computer 30 application software complete installation 13 custom installation 13–14 installing 11–18 starting 14 uninstalling 19 assigning drive letter 28 audio cable connecting 7 disconnecting 9 audio connector 7 audio distortion 25–26, 36 B bi-directional parallel port 27, 33, 34 buffer size 36 buffer underrun 26–27 C cables audio 7, 9 data 6, 9 power 3 printer 5 , 10 capacity, CD 35 CD-ROM cleaning discs 22 CD-ROM drive changing drive letter 28 identifying
I-2 registering 14 returning 43 selecting CDs 21–22 serial number 45 sharing parallel port with printer 4–5, 25 Software Installation CD 11 software programs included in package 13 starting the application software 14 supported discs 35 system requirements 32–33 uninstalling 19 using earphones or speakers 25 cleaning CD-Writer drive 22 closing tray 20 compatibility 32 –33 compatibility problems 30 –31 compatible parallel port 27, 33, 34 compression software 29 computer identifying model 45 processor speed
I-3 Maxtor brand 30 speed 33 storage requirements 32 transfer rate 32, 33 high-pressure air 22 humidity specifications 36 I I/O channel setting 31, 32 IBM Aptiva brand computer 31 inserting a CD 20–21 installing application software 11–18 complete installation 13 custom installation 13–14 directory selection 13 installing parallel driver files 11, 13, 31 IRQ setting 32, 34 L listening to music CDs 7 M maintenance 22 Maxtor brand hard drive 30 memory 32 , 33, 46 model number, locating 45 moving CD-Writer
I-4 purchasing CDs 22 Q QuickTour 13, 14 R RAM.