
HP SureStore CD-Writer Plus User's Guide - C4381-90100
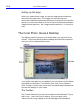
Table Of Contents
- Hewlett-Packard Limited Warranty Statement
- HP Software License Agreement
- Chapter 1: Installing CD-Writer Plus and Software
- Chapter 2: Using Your CD-Writer Plus
- Chapter 3: Problem Solving
- Chapter 4: Sharing Your CDs
- Chapter 5: Making Data CDs
- Chapter 6: Making Music CDs
- Chapter 7: Making Inserts and Labels
- Chapter 8: Copying CDs
- Chapter 9: HP Simple Trax
- Chapter 10: Adobe PhotoDeluxe
- Chapter 11: Corel Print House Magic
- Chapter 12: Photo Organizer
- Chapter 13: PaperMaster Live Quick-Start Tutorial
- Searching for a Document
- Viewing and Customizing Your Documents
- Faxing and Printing Your Documents
- Creating a New Cabinet and Copying Information
- Creating Customized Drawers and Folders
- Filing a Document into PaperMaster Live
- Publishing, Sharing and Archiving Cabinets to CD
- Viewing a Cabinet Given to you on CD
- Congratulations!
- Upgrade Notification
- Chapter 14: Norton AntiVirus
- Appendix A: Technical Information
- Appendix B: Customer Support
- Index

12-2 Getting Started
Adding Photos to the Media Library
Photo Organizer can import picture files from any drive that can be
accessed by your computer: hard drives, floppy drives, CD-ROM drives,
and network drives. It can also import pictures directly from a scanner.
To add photos to the Media Library:
1. Click the Get tab and click an icon representing the import source: Files
(on a hard drive), Compact Disc, Floppy, PhotoMail or Scanner. You
can also choose File, Import Files or Action, Get from the main menu.
2. A series of questions guides you through the import process for each
source.
3. The final screen in the import process selects the destination for the
imported pictures. The pictures can be placed on the Light Table, which
is a temporary work space for organizing and editing pictures, or in an
album. You may choose an existing album or create a new album.
Viewing Pictures
Pictures can be viewed on four different tabs: Gallery, Presenter,
Catalog, and Details. The different views can be accessed by clicking a
tab name at the bottom of the Viewer pane or by choosing View from
the main menu.
■ Gallery is the default view. Pictures are displayed as thumbnails.
■ Presenter displays enlarged pictures, one at a time. Thumbnails of all
pictures are displayed in a film strip. Display, rotation, and notes are
controlled using the buttons at the bottom of the window.
■ Catalog displays a thumbnail of each picture, along with the picture's
title, author, date created, comments, keywords and classifications.
Every field, except the file path, can be edited directly on the screen.
■ Details displays information in a table format, with no thumbnails.
Each picture has a row of information.