
HP SureStore CD-Writer Plus User's Guide - C4381-90100
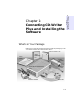
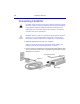
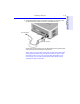
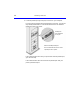
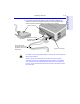
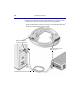
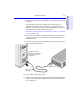
Table Of Contents
- Hewlett-Packard Limited Warranty Statement
- HP Software License Agreement
- Chapter 1: Installing CD-Writer Plus and Software
- Chapter 2: Using Your CD-Writer Plus
- Chapter 3: Problem Solving
- Chapter 4: Sharing Your CDs
- Chapter 5: Making Data CDs
- Chapter 6: Making Music CDs
- Chapter 7: Making Inserts and Labels
- Chapter 8: Copying CDs
- Chapter 9: HP Simple Trax
- Chapter 10: Adobe PhotoDeluxe
- Chapter 11: Corel Print House Magic
- Chapter 12: Photo Organizer
- Chapter 13: PaperMaster Live Quick-Start Tutorial
- Searching for a Document
- Viewing and Customizing Your Documents
- Faxing and Printing Your Documents
- Creating a New Cabinet and Copying Information
- Creating Customized Drawers and Folders
- Filing a Document into PaperMaster Live
- Publishing, Sharing and Archiving Cabinets to CD
- Viewing a Cabinet Given to you on CD
- Congratulations!
- Upgrade Notification
- Chapter 14: Norton AntiVirus
- Appendix A: Technical Information
- Appendix B: Customer Support
- Index

1-8 If You Have Problems
If You Have Problems
After connecting your CD-Writer Plus drive and turning on your
computer, the computer should start (boot) as it normally does. If it does
not, check the following items:
■ Is the computer power plugged in?
■ Is each device plugged in and turned on?
■ Are all cables properly plugged into the back of your computer and
the CD-Writer Plus drive?
■ Try turning off your computer. Wait at least 20 seconds before turning
it back on.
Installing the Software for Windows 95 or
Windows NT 4.0
After the CD-Writer Plus drive is attached to your computer, you are
ready to install the application software.
NOTE: You must run the installation program. The installation program
converts the files from the CD into a usable format.
If your computer DOES NOT have a CD-ROM drive:
1. To get your CD-Writer Plus started right away, insert the diskette labeled
Driver Installation into your floppy drive.
2. Click the Start button on the task bar, select Run.
3. Type
A:\SETUP (where A: is your floppy drive’s letter), and press ENTER.
The parallel port driver files are installed. This may take several minutes
and your mouse cursor will not move.
4. Windows NT only: Reboot your computer before continuing.
5. Insert the CD labeled “Software Disc 1” into your new CD-Writer Plus
drive and proceed with step 2 in the next procedure.
NOTE: For information about inserting a CD into the CD-Writer Plus drive,
see “Inserting a CD” on page 2-1.