
HP SureStore CD-Writer Plus User's Guide - C4381-90100
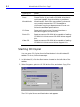
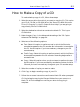
Table Of Contents
- Hewlett-Packard Limited Warranty Statement
- HP Software License Agreement
- Chapter 1: Installing CD-Writer Plus and Software
- Chapter 2: Using Your CD-Writer Plus
- Chapter 3: Problem Solving
- Chapter 4: Sharing Your CDs
- Chapter 5: Making Data CDs
- Chapter 6: Making Music CDs
- Chapter 7: Making Inserts and Labels
- Chapter 8: Copying CDs
- Chapter 9: HP Simple Trax
- Chapter 10: Adobe PhotoDeluxe
- Chapter 11: Corel Print House Magic
- Chapter 12: Photo Organizer
- Chapter 13: PaperMaster Live Quick-Start Tutorial
- Searching for a Document
- Viewing and Customizing Your Documents
- Faxing and Printing Your Documents
- Creating a New Cabinet and Copying Information
- Creating Customized Drawers and Folders
- Filing a Document into PaperMaster Live
- Publishing, Sharing and Archiving Cabinets to CD
- Viewing a Cabinet Given to you on CD
- Congratulations!
- Upgrade Notification
- Chapter 14: Norton AntiVirus
- Appendix A: Technical Information
- Appendix B: Customer Support
- Index

How to Make a Copy of a CD 8-3
Chapter 8: Copying CDs
How to Make a Copy of a CD
To make a backup copy of a CD, follow these steps:
1. Select the source drive from which you want to copy the CD. This can be
your CD-R, CD-RW, or CD-ROM drive. See “Source CD-ROM Drives for
CD-to-CD Copying” in the CD Copier Online Help if you are going to
copy directly from a CD-ROM drive.
2. Select the destination drive that contains the blank CD. This is your
CD-RW drive.
3. Make changes, if any, in the Advanced tab settings. See “CD Copier
Advanced Tab Settings” on page 8-4.
4. Select one of the following options:
■ Test—Select this option to perform a test in which the files to be
recorded are passed to the CD recorder. No information is recorded to
the CD. Use this option if you have made any changes to your CD
recorder setup.
■ Test & Copy—Select this option to perform a test in which the files to
be recorded are passed to the CD recorder. Recording begins after a
successful test.
■ Copy—Select this option when you do not want to perform the test.
Use this option if you have successfully recorded a number of similar
CDs and you have not made any changes to your CD recorder setup.
5. Select the number of copies you want to make.
6. Click Copy to begin recording a copy of your CD.
7. Follow the on-screen instructions and insert a blank CD when prompted.
CD Copier begins copying the files and folders from your source to a
blank CD. A final message box notifies you when the copying is
complete.