
HP SureStore CD-Writer Plus User's Guide - C4381-90100
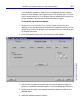
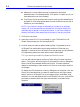
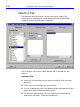
Table Of Contents
- Hewlett-Packard Limited Warranty Statement
- HP Software License Agreement
- Chapter 1: Installing CD-Writer Plus and Software
- Chapter 2: Using Your CD-Writer Plus
- Chapter 3: Problem Solving
- Chapter 4: Sharing Your CDs
- Chapter 5: Making Data CDs
- Chapter 6: Making Music CDs
- Chapter 7: Making Inserts and Labels
- Chapter 8: Copying CDs
- Chapter 9: HP Simple Trax
- Chapter 10: Adobe PhotoDeluxe
- Chapter 11: Corel Print House Magic
- Chapter 12: Photo Organizer
- Chapter 13: PaperMaster Live Quick-Start Tutorial
- Searching for a Document
- Viewing and Customizing Your Documents
- Faxing and Printing Your Documents
- Creating a New Cabinet and Copying Information
- Creating Customized Drawers and Folders
- Filing a Document into PaperMaster Live
- Publishing, Sharing and Archiving Cabinets to CD
- Viewing a Cabinet Given to you on CD
- Congratulations!
- Upgrade Notification
- Chapter 14: Norton AntiVirus
- Appendix A: Technical Information
- Appendix B: Customer Support
- Index

HP Simple Trax Control Panel Overview 9-13
Chapter 9: HP Simple Trax
1. All Files & Folders: Selects all files and any subfolders in the current
folder for protection. The contents of the current folder appear in the
File List.
2. File Type: Specifies the type of files that are selected for protection
and displayed in the File List. Type the desired file filter in the
accompanying combo box or select a file filter you have used before
from the drop-down list. Only filters of the form *.??? are allowed.
Some examples of these filters are *.bmp, *.doc, and *.txt. The
advantage of using a file type when creating a Protection List is that
future files of that type are automatically included.
3. Individual Files: Allows you to choose the specific files to be
protected from the File List. Click the desired file(s).
■ Add to List Button: Adds the selected files to the Protection List.
Protection List
■ Protection List: Contains all files and folders you have designated for
protection. You can then schedule a protection session to copy all
items in the Protection List to a CD at once.
■ Remove from List Button: Click the items you want to remove from
the Protection List and click this button.
Schedule Setup Tab
The Schedule Setup tab allows you to schedule automatic protection of
all items in the Protection List.
The controls on this tab are contained in a single group:
■ Day of the Week Buttons: Use this row of buttons to select the day(s)
on which to perform a scheduled protection session. You can click as
many days as desired. The selected day buttons remain pressed. To
remove a day from the schedule, click the desired button.
■ Options: These radio buttons set the protection options.
All files in the list: Protects every item in your Protection List,
whether changed or not.
Only Changed files: Protects only those items in your Protection List
that have changed since the last protection session.
■ Start Time: Type the time at which the scheduled protection session
is to begin. The Start Time is the same for all selected days.