HP CD-Writer Plus User’s Guide Copyright 1999. Hewlett-Packard Company. All rights reserved. Hewlett-Packard is a registered trademark of the Hewlett-Packard Company. Microsoft and Windows are U.S. registered trademarks of Microsoft Corporation. Names of products mentioned herein are used for identification purposes only and may be trademarks and/or registered trademarks of their respective company.
Laser Safety This unit employs a laser. Do not remove the cover or attempt to service this device due to the possibility of eye damage. CAUTION Use of controls or adjustments or performance of procedures other than those specified herein may result in hazardous laser radiation exposure. Contains: Class 1 Laser Product Innehåller: Klass 1 Laserapparat Sisältää: Luokan 1 Laserlaite Enhält: Klasse 1 Laser-Produkt DANGER: INVISIBLE LASER RADIATION WHEN OPEN. AVOID DIRECT EXPOSURE TO BEAM.
Table of Contents Contents of the Electronic User’s Guide . . . . . . . . . . . . . . . . . . . . . . . . . . 4 Installation Notes Read the Installation Poster . . . . . . . . . . . . . . . . . . . . . . . . . . . . . . . . . . . . 5 Introduction to SCSI Devices . . . . . . . . . . . . . . . . . . . . . . . . . . . . . . . . . . . 5 How to Set the SCSI ID . . . . . . . . . . . . . . . . . . . . . . . . . . . . . . . . . . . . . . . 6 How to Set the Termination . . . . . . . . . . . . . . . . . . . . .
Contents of the Electronic User’s Guide Contents of the Electronic User’s Guide Additional information is available in the electronic User’s Guide. To view this online documentation click Start on the taskbar, point to Programs, HP CD-Writer Plus, Information, and select User’s Guide. You can view this information through your web browser.
Installation Notes Read the Installation Poster The Quick-Start installation poster describes how to install your HP drive. Follow the instructions on the poster and refer to this chapter if you need additional information about: ■ Introduction to SCSI devices ■ How to set the SCSI ID on your HP drive ■ How to set the termination on your HP drive ■ How to connect an audio cable Introduction to SCSI1 Devices SCSI (pronounced scuzzy) devices are peripherals like hard drives, CDROMs, scanners, etc.
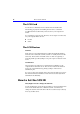
How to Set the SCSI ID The SCSI Card A SCSI card (not included) and its software must be installed and functioning properly before installing the new drive. Consult the documentation that came with your SCSI card or your computer for details.
How to Set the SCSI ID 7 What SCSI ID should I use for the HP drive? When you place Software Disc 1 in your CD-ROM and click Start Installation, the software will check your system and recommend a SCSI ID you can use on the HP drive. Example: SCSI ID 3 is available. Alternatively, if you have already installed the software, you can get a list of all the detected SCSI devices in your computer and the IDs they use.
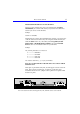
How to Set the Termination Find the SCSI ID you will use on the graphic below and notice which pairs of pins are to have jumpers and which will not. ID4 ID4 ID2 SCSI ID ID1 ID2 SCSI ID ID1 4 0 Usually reserved for a hard drive 1 5 Usually reserved for a hard drive 2 6 3 7 Usually reserved for the SCSI card itself Depiction of SCSI IDs: IDs are defined by the placement of jumpers on the ID1, ID2, and ID4 pins on back of the drive.
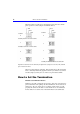
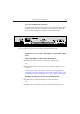
How to Set the Termination 9 How do I terminate the HP drive? To terminate the HP drive place a jumper over the pins labeled ACTIVE TERM on back of the drive. A jumper is a small cap that connects the pins, and can be pulled off or replaced with needle-nose pliers. View of the back of the drive showing termination pins labeled ACTIVE TERM.
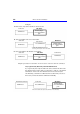
How to Set the Termination Examples: HP drive is the only device attached to the SCSI card: SCSI card HP drive Terminated LEAVE jumper on ACTIVE TERM pins HP drive is installed at the end of SCSI chain: SCSI card SCSI device Not terminated * Terminated HP drive LEAVE jumper on ACTIVE TERM pins * Disable the termination on a device that was previously the end of the chain.
How to Connect an Audio Cable Graphic representation of a SCSI chain with an external device. How to Connect an Audio Cable Should I connect an audio cable? You do not need an audio cable to use your HP drive. The audio cable is used only for listening to music CDs through your computer’s sound system. When the HP drive records data, it uses the data cable, not the audio cable.
How to Connect an Audio Cable The audio connectors have four prongs and are often on the outer edge of the sound card. On many sound cards the connectors for the audio cable are labeled CD IN. ■ Connect the audio cable. The audio cable may connect horizontally or vertically to the sound card. The connectors only fit one way. If a connector doesn’t fit, try turning it around. ■ Some sound cards have more than one audio cable connector.
About Making CDs When Should I Use CD-R (Recordable or Write-Once) Discs? Files copied to a CD-R disc are permanently recorded on the disc. The space the files occupy on the disc cannot be used for anything else. Use CD-R discs to: ■ Share your CDs with users that have standard CD-ROM drives ■ Make audio CDs ■ Permanently save files When Should I Use CD-RW (ReWritable) Discs? With CD-RW discs you can write, erase, and rewrite files easily from your software applications or from the Windows Explorer.
How do I Make CDs That Can be Read on Other Computers? How do I Make CDs That Can be Read on Other Computers? Use the Easy CD Creator (Data) software and CD-R discs when you want to create CDs you can share with other users, for example if you want to send the CD to your co-workers. Virtually all CD-ROM drives and operating systems (Windows 95, Windows 98, Windows NT, Windows 3.x, and DOS) can read CD-R discs made with Easy CD Creator (Data).
Can I Avoid Swapping Audio CDs In and Out of the Drive? 15 Can I Avoid Swapping Audio CDs In and Out of the Drive? Making an audio CD may involve swapping CDs in and out of drives many times. For example, if you make the CD using your CD-Writer Plus as both the source and destination drive, you will need to swap CDs every time a new track is copied to the CD-Writer Plus drive. To minimize the number of times you swap CDs: 1. Copy the tracks to your hard drive using Easy CD Creator.
Can I Use the New 80 Minute Audio CDs?
HP Disaster Recovery HP Disaster Recovery is an application that will help you to recover your data and operating system after a hard-drive failure. It is important that you create a Disaster Recovery Set as soon as possible. Should a disaster occur, the information in the Disaster Recovery Set will enable you to return your system to the state it was in at the time you created your Disaster Recovery Set.
Getting Started For Windows 95 and Windows 98 ■ One or more blank, formatted 1.44MB diskettes* ■ One or more blank HP CD-R/CD-RWs* ■ Windows 95/98 installation CD or install set What is an install set? An install set is the list of files used to install a product or operating system. Computers shipped with preinstalled operating systems (i.e. Windows 95/98) may not include a Windows installation CD.
Getting Started 19 set before the drive failure. In order to do this, it may be helpful to make a record of your current partition settings on paper and keep an updated record of these settings with each DR Set. What is a partition? A partition is a logical section of your hard disk. One physical hard disk may be partitioned into two or more logical hard-drives. To make a record of your partition settings: 1. Double-click the My Computer icon located on your desktop. The My Computer Window appears. 2.
Recovering Your Data 2. If you do not receive the messages listed in the steps for data recovery, follow the directions for creating another Disaster Recovery Set. See “Creating the Disaster Recovery Set” on page -18. To test your Windows NT Disaster Recovery Set: 1. Follow steps 1 through 8 in the Windows NT section of “Recovering Your Data.” WARNING: Be sure to discontinue testing the DR Set when instructed to do so.
Recovering Your Data 21 2. Replace any damaged hard-drives with comparable drives. In order to recover all of your information, HP Disaster Recovery must have at least as much hard disk space as existed before the drive failure. 3. Insert the Windows Startup Disk (diskette #1 of the DR Set) into the 3.5” floppy drive from which your computer boots, and restart your computer. A DOS screen appears. 4.
Recovering Your Data Test successful. To continue your recovery, select RECOVER. If you are testing, select EXIT. 9. To continue recovering your system, press F5. Or, To exit the Disaster Recovery process, press F10, remove any diskettes or CDs from your drive(s) and restart your computer. WARNING: If you are just performing a test of your Disaster Recovery Set, the test is now complete. Do not continue past this step. Please remove any diskettes and CDs from your drive(s) and restart your computer.
Recovering Your Data 23 After recovering the volume(s), you may wish to view the REPORT.TXT file which contains a text summary of the files that could not be recovered. If you wish to view this file, you must first exit the program by pressing Esc twice, then type EDIT REPORT.TXT. After reading the text, press Alt+F, then press X to exit the editor. For more information on files that could not be recovered, see “Files Not Recovered” on page 19. Your recovery is complete.
Recovering Your Data 4. When prompted, insert Windows NT Workstation Setup Disk #2 into the 3.5” floppy drive from which your computer boots.. The NT Setup screen should now appear. 5. Choose Express Setup (recommended) or Custom Setup from the NT Setup screen. ■ Express Setup—Should be selected if you do not need to partition any drive(s), or if you are testing your DR Set. Select this option by pressing Enter.
Recovering Your Data 25 Recovery Set. Click Cancel to exit, remove any diskettes and CDs from your drive(s) and restart your computer. If you are performing an actual recovery, proceed to the next step. 9. Follow the instructions on the Wizard screens to complete the Disaster Recovery.
Recovering Your Data ■ Damaged hard-drive—If the hard-drive you are recovering to is damaged, some files may not be recoverable. Any files that could not be recovered due to a damaged hard-drive will be listed in the Report file. Replace or fix the current hard-drive and perform another Disaster Recovery.
Solving Installation Problems If you need further assistance after reviewing this chapter, contact HP Customer Care directly by calling the appropriate telephone number from the list beginning on page 38. Things to Try First Try the following suggestions if your HP drive does not appear under Windows Explorer once you have completed the installation. If the problem persists, see the Installation Troubleshooting section below. ■ Make sure the computer is plugged in and that each device has power.
Installation Troubleshooting Ejecting a Stuck CD. You can eject a stuck CD even when your drive’s power is off. Use this procedure only if the normal eject functions do not work! ■ Straighten a standard paper clip. ■ Insert one end of the straightened paper clip into the emergency eject pinhole on the front panel of the drive. ■ Apply steady, gentle pressure until the drive door begins to open. ■ Gently pull the drive door open and remove the CD.
Installation Troubleshooting 29 Controllers. Your SCSI card should be listed. If an X or exclamation mark appears above it see below. In Windows NT click the Start button on your task bar, select Settings, and Control Panel. Double-click on SCSI Adapters. Your SCSI card should be listed. ■ If your SCSI controller is not listed and you have one installed, see the documentation that came with the SCSI card or contact the manufacturer to find out how to fix it.
Installation Troubleshooting ■ The new drive is the last of several devices in a chain connected to one SCSI card. In this case remove the termination in the device that was previously at the end of the chain. See the documentation provided with the device to learn how to disable the termination. REMOVE the ACTIVE TERM jumper if: ■ The new drive is connected between two existing SCSI devices, or between a SCSI device and the SCSI card.
Installation Troubleshooting 31 Check the Readme file, the electronic User’s Guide, online information resources, and diagnostic software. ■ Check the Readme file that came with the HP drive. To view the Readme file, click the Start button on your taskbar, select Programs, HP CD-Writer Plus or HP DVD Writer, Information, and select Readme. ■ The electronic User’s Guide contains additional troubleshooting information.
Installation Troubleshooting
Customer Support HP Customer Care Online www.hpcdwriter.com Visit the HP CD-Writer web site at http://www.hpcdwriter.com and click on Technical Support to get immediate access to a wealth of up-todate information 24 hours a day, seven days a week. You will find troubleshooting documents, maintenance and efficiency tips, ideas for using your products and much more.
HP Customer Care by Phone HP Customer Care by Phone Phone Support During Warranty During the warranty period telephone support is provided free of charge and only long-distance charges apply. The list of telephone numbers begins on page 38. After the Warranty After the warranty period support is still available for a per-incident fee. The list of telephone numbers begins on page 38.
Before You Call HP Information (Help on page 35) For your computer Computer brand and model Operating system and version? Windows 95, Windows 98, or Windows NT 4.
Before You Call HP Drive serial number The HP drive serial number appears on the underside of the tray as well as on the main label on the top of the drive. You can also obtain the drive serial number by clicking on the Start menu on the taskbar, then selecting Programs, HP CD-Writer Plus or HP DVD Writer, Utilities, and Diagnose. Select the drive to check and then click on the Drive Data tab. The drive serial number is among the information displayed.
Before You Call HP 37 Sound card In Windows 95 and Windows 98 from the Start menu on the taskbar, select Settings and then Control Panel. Double-click on System. Select the Device Manager tab. Double-click on Sound, video, and game controllers. Write down the names of the devices that are displayed. Example: Sound Blaster In Windows NT from the Start menu on the taskbar, select Settings and then Control Panel. Double-click on Multimedia, select the Devices tab, and double-click Audio Devices.
Telephone Numbers Telephone Numbers For telephone number updates: http://www.hp.com/cpso-support/guide/psd/cscinfo.html USA (Support available 24 hours a day, 7 days a week) Literature and dealer referral. . . . . . . . . . . 970-635-1500 During warranty period (Support is provided free of charge during warranty; your only cost is the long-distance charge.) HP Customer Care . . . . . . . . . . . . . . . . . .
Telephone Numbers Hungary. . . . . . . . . . . . . . . . . . . . . . . . . . . . 01 343 0310 Ireland . . . . . . . . . . . . . . . . . . . . . . . . . . . . . 01 662 55 25 Israel (M-F, CET + 1hr) . . . . . . . . . . . . . . . . 09 952 4848 Italy . . . . . . . . . . . . . . . . . . . . . . . . . . . . . . 02 2 641 0350 Netherlands . . . . . . . . . . . . . . . . . . . . . . . . 020 606 87 51 Norway . . . . . . . . . . . . . . . . . . . . . . . . . . . . . 22 11 62 99 Poland (M-F, CET + 1hr) . . . . . . . .
Returning a Drive Returning a Drive If your Hewlett-Packard product requires repair or replacement, call the appropriate number for your country/region from the list beginning on page 38 to receive instructions.