
AC089A Cable Management Bracket Installation Guide (supersedes ProLiant DL380 G4 Cable Management Bracket Installation Guide)


2 Installing the Kit
At the time of publication, these installation instructions apply to the specific HP servers that
are identified in Section 1.1. This bracket might also be adapted for other cable management
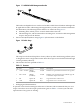
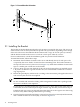
uses, as specified in the installation documentation for HP Cluster Platform models. Figure 2-1
shows the outward mounting position for the bracket, and the location of the two case nuts that
secure the bracket to the rack. You will not be able to insert these cage nuts if the server's rail kit
is already installed in the rack. The correct installation sequence for both the inward and outward
mounting of the kit is:
1. Hold the bracket so that it aligns with the appropriate U location on the left (callout 1) and
right side (callout 2) of the rack.
2. Install the machine screws (callout 3) and cage nuts (callout 4) for the cable management
bracket (callout 5).
3. Install the rail kit tracks in the rack.
4. Install the server in its rail kit.
Figure 2-1 Outward Bracket Orientation
4
3
3
5
2
1
4
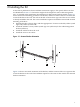
Figure 2-2 shows an inward orientation of the bracket, and the location of the two cage nuts that
secure the bracket to the rack. The installation sequence is the same as that used for the outward
bracket orientation.
9