
HP 16/18-Port Cable Management Kit Installation Guide (538272-doc)

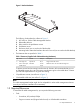
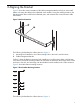
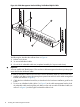

Figure 1 Bracket Hardware
1
2
3
4
5
6
The following list describes the callouts in Figure 1:
1. HP 16-Port or 18-Port Cable Management Bracket
2. Releasable cable tie
3. Holes used for the push-button mounts
4. Push-button mount
5. Rail-mount hook (one on each end of the bracket)
6. Mounting hole to fasten the bracket to the rack's rear rail (one on each end of the bracket)
• The fasteners that are specified in Table 1.
Table 1 Fasteners (Supplied with Cabinet Mounting Hardware)
DescriptionTorqueFormatSizeQty.
Cage nut for M6 screw.N/ASquare nutM6 cage nuts2
Machine screw. For use with M6 cage nut.25-30
in/lb
PosidriveM6 x 16mm pan
head screws
2
To prevent screws from becoming loose because of vibration, HP recommends that you use
an adjustable torque drive, set to the torque specifications given in the table above. Contact
your HP sales representative if any parts are missing.
• 18 push-button mounts (see callout 4 in Figure 1)
• 18 releasable cable ties (see callout 2 in Figure 1)
Note:
This cable management bracket might also be adaptable for other cable management solutions
(consult your hardware installation documentation).
1.5 Required Resources
To install the HP cable management kit, you require the following resources:
• Tools:
Screwdriver, #2 (medium) Phillips◦
◦ Cage-nut insertion tool (shipped with the rack) or a flat-headed screwdriver
1.5 Required Resources 5