
Linux Clusters QsNetII Cable Management Kit Installation Guide

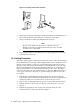

Offset screwdriver (or ratchet driver) with a 0.25-inch wide flat-blade
tip.
- T25 Torx driver.
- Cage nut insertion tool (optional).
- Marker, pencil, or masking tape to identify mount locations.
• Environment:
- A work surface adjacent to the rack.
- A small work platform, stable stepladder, or step stool.
_____________________ Caution ____________________
Always install components into a rack working from the bottom
of the rack upwards.
• Interconnect Port Covers (not provided in this kit)
If you disconnect a cable from a live port and do not intend to replace the cable
immediately, the uncovered port will radiate electromagnetic interference
(EMI). This EMI might affect the operation of the interconnect and adjacent
components. Ensure that you cover all functioning ports with the appropriate
EMI shield.
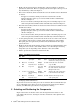
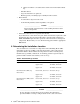
8 Determining the Installation Location
You can install one or two kits in a single Interconnect Building Block (IBB).
Depending on the type of IBB, you mount the brackets at the rack locations
specified in Table 2. Each numbered rack position has three mounting holes,
identified as top, middle, and bottom. A mounting position is specified by its
position number and the relevant hole, such as
34 top.
Table 2: Rack Mounting Locations
Interconnect Location Bracket Rack Mount Position
Single Interconnect IBB Lower front, lower rear 08 bottom, 08 top
Upper front 18 middle, 19 bottom
Upper rear 19 middle, 20 bottom
Dual Interconnect IBB, top
interconnect
Lower front, lower rear 27 bottom, 27 top
Upper front 37 middle, 38 bottom
Upper rear 38 middle, 39 bottom
Dual Interconnect IBB, bottom
interconnect
Lower front, lower rear 07 bottom, 07 top
Upper front 17 middle, 18 bottom
Upper rear 18 middle, 19 bottom
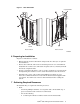
________________________ Caution _______________________
Do not attempt to mount the kit in any position other than those
specified in Table 2. Doing so will put strain on the cable connections
4 QsNet
II
Cable Management Kit Installation Guide