
ProCurve 1U Rack Mount Bracket Installation Guide


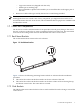
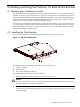

1. Lift and align the switch so that the slide brackets are level with the rack mount brackets
(see callout 1 in Figure 2-4.
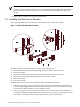
2. Slide the switch in until the thumb screws (quantity four) on the slide bracket align with the
thread holes in the rack mount bracket (see callout 1 in Figure 2-5).
Figure 2-5 Thumb Screw on the Slide Bracket (Quantity Four)
3
4
2
1
The following list corresponds to the callouts shown in Figure 2-5.
1. Thumb screw (quantity four)
2. Rear rack column
3. Slide bracket
4. ProCurve switch
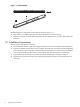
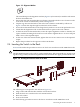
Warning!
To avoid potential injury or damage to cluster components, always use both hands when
you remove or replace the ProCurve switch. Although the ProCurve switch is not heavy, it
might slide out and drop from it's mounting position during removal.
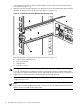
3. Secure the slide bracket by tightening all four thumb screws and tighten to the required
torque (see Figure 2-5).
Note:
There is no automatic locking mechanism. You must secure the slide brackets with the four
thumb screws provided on the slide bracket.
10 Installing and Using the ProCurve 1U Rack Mount Brackets