
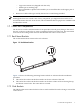
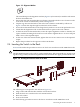
ProCurve 1U Rack Mount Bracket Installation Guide
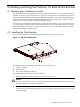


4 Removing a Switch for Servicing
Bring the cluster to an appropriate state for switch component removal and put the rack into a
safe and stable state for component removal. You must ensure that you can easily reach the
switch and handle it safely.
To remove a switch from a rack, follow these steps:
1. At the rack power distribution unit, power off the circuit to which the ProCurve Switch is
connected. Disconnect the switches power cable.
2. Disconnect and remove each management network and network cable bundle until all
networking ports are unplugged.
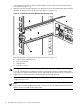
3. Loosen the four thumb screws and slide the switch half way out of the rack mount brackets.
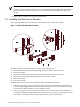
Warning!
To avoid potential injury, or damage to cluster components, always use both hands when
you remove or replace the ProCurve switch. Although the ProCurve switch is not heavy, it
might drop out of its track during removal.
4. Check the removal path of the switch to ensure that any other cabling does not obstruct its
removal. You might need to either tie back any obstructing data and power cables or
disconnect them. If you choose to disconnect the cables, ensure that you tag the cables and
write down their correct connection pathway.
5. Slide the switch all the way out of the rack.
6. Remove the slide brackets from the switch chassis, if necessary, for servicing the ProCurve
switch.
Important:
Carefully retain the slide bracket mounting screws for reuse if the ProCurve switch is to be
remounted or if it is replaced with a new switch. Use only this type of screw for mounting the
switch. Incorrect screws might damage the internal components of the switch and interfere with
the correct operation of the rack mount kit.
13