
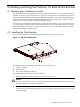
ProCurve 1U Rack Mount Bracket Installation Guide


— Cage-nut insertion tool (shipped with the rack).
— Marker pen or masking tape.
— Short stepladder or platform that enables you to install brackets in the upper part of
the rack.
• Resources: Cables of the type used by the ProCurve switch being installed.
Note:
Although the ProCurve switch is not a heavy component, you might need to install it in an
elevated location in the rack. In such cases, HP recommends that two people are available to lift
and install the switch.
1.7 Orient the Components
The ProCurve switch is mounted with its front panel (the network ports) facing to the rear of
the rack, so that its cooling fans or vents are visible from the front of the rack. This orientation
is because of the routing of the network cable bundles that connect to the switch.
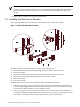
1.7.1 Rack Mount Brackets
The rack mount brackets mount on the rack columns.
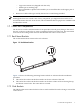
Figure 1-2 Rack Mount Bracket
1
2
Figure 1-2 shows the following mounting features which are referenced in the installation
procedure.
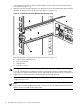
1. This end of the rack mount bracket attaches to the rear column of the rack.
2. This end of the rack mount bracket attaches to the front column of the rack using the top
and bottom cutout holes. The center hole is not used.
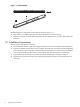
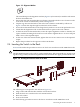
1.7.2 Slide Brackets
The slide brackets are mounted to the ProCurve switch with the flat surface facing in toward the
switch chassis.
1.7 Orient the Components 5