
ProCurve 3500 Series CX4 Cable Management Bracket Installation Guide


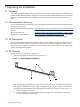
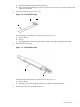
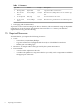
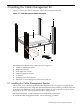

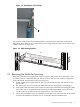


Figure 2-3 Attaching the 5.0 Inch Strap
1
The vertical routing of the cable bundle depends on the HP Cluster Platform configuration.
Regardless, the 5.0 inch strap provides the vertical routing and strain relief for the cables in the
cabinet, as shown in Figure 2-4.
Figure 2-4 Cable Routing Example
2.2 Removing the Switch for Servicing
Bring the component to an appropriate state for removal, and put the rack cabinet into a safe
and stable state for component removal. You must ensure that you can reach the component
easily and handle it safely. Remove the unit as follows:
1. Switch off the power supply from the rack's power distribution unit and disconnect the
power cable.
2. Disconnect and remove each network cable until all networking ports are unplugged.
3. Unstrap the cables and remove the connectors from the ports. When disconnecting the cables,
ensure that you do not bend them more than the recommended bend radius. The cable
specifications are provided in the documentation for your cluster type.
4. Loosen the four thumb screws and slide the switch all the way out of the rack, as described
in the documentation for the ProCurve 1U rack mount bracket installation kit.
2.2 Removing the Switch for Servicing 11