
ProCurve 3500 Series CX4 Cable Management Bracket Installation Guide


2 Installing the Cable Management Kit
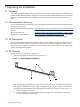
Figure 2-1 shows the correct orientation of the cable management bracket.
Figure 2-1 Cable Management Bracket Orientation
1
3
4
7
2
5
6
The following list describes the callouts shown in Figure 2-1:
1. ProCurve 3500 Series switch
2. Right side slide rail
3. Front right rack column
4. Cable management bracket
5. yl module
6. Mounting screw and cage nut
7. Direction of view looking in from the front of the rack
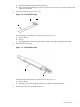
2.1 Installing the Cable Management Bracket
The location of the cable management bracket depends on the rack position occupied by the
ProCurve 3500 Series switch. Align the cable management bracket with the yl module in the rear
of the ProCurve 3500 series switch. The bracket occupies 1U (1.75 inches) of rack space and is
mounted on the front of the HP 10000 Series Rack facing inward.
For more information, consult your HP Cluster Platform documentation.
To install the cable management bracket, use the following procedure:
2.1 Installing the Cable Management Bracket 9