
ProCurve 5406zl CX4 Cable Management Brackets Installation Guide


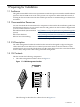

Right side cable management bracket (left side not shown)1.
2. Note that the top channel for both the right and left brackets is narrower than the rest
of the channels (right side shown).
Note:
The right bracket is shown in Figure 1-1. The left bracket (not shown) is exactly opposite
from the right bracket.
• The fasteners that are specified in Table 1-1.
Table 1-1 Fasteners
DescriptionTorqueFormatSizeQty.
Cage nut for M6 x 16mm screw.N/ASquare nutM6 cage nuts4
Machine screw, Phillips head. For use with the cage
nut.
30 in/lbPhillips
(Posidrive)
M6 x 16 mm
screws
4
• Packaging and documentation.
To prevent screws from becoming loose due to vibration, HP recommends using an adjustable
torque driver set to the torque specifications shown in Table 1-1. Contact your HP sales
representative if any parts are missing.
1.5 Required Resources
To install the kit, you need the following resources:
• Tools:
— Screwdriver, #2 (medium) Phillips.
— Cage-nut insertion tool (shipped with the rack) or a flat-bladed screwdriver.
— Marker pen or masking tape.
• Resources: A sample cable of the type used by the system interconnect.
• Environment:
— A work surface adjacent to the rack.
— A stable work platform or step stool that lets you safely reach the servers installed in
the upper part of the rack.
10 Preparing for Installation