
ProCurve 6400 CX4 Cable Management Kit Installation Guide (5991-7987)


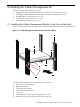

The location of the cable management bracket depends on the rack position occupied by the HP
ProCurve 6400cl switch. Align the cable management bracket with the cl module in the rear of
the HP ProCurve 6400cl switch. The bracket occupies 1U (1.75 inches) of rack space and is mounted
on the front of the HP 10000 Series Rack facing inward as shown in Figure 2-1.
For more information, consult your HP Cluster Platform documentation.
To install the cable management bracket, follow these steps:
1. Determine the cable management bracket installation location by aligning the cable
management bracket with the HP ProCurve 6400 switch's cl module (see callout 5 in
Figure 2-1).
2. Ensure that the cable management bracket's strap mounting face is lined up with the cl
module's CX4 connectors as shown in Figure 2-1. The strap mounting face radius should
face upward so as not to damage the CX4 cables.
3. Fasten the cable management bracket to the front rail by using four 10–32 screws and clip
nuts. Fasten the screws to the recommended torque listed in Table 1-1 (page 8).
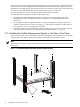
2.2 Installing the Cable Management Bracket in the Rear of the Rack
Figure 2-2 shows the correct orientation of the cable management bracket in the rear of the rack
to support the CX4 cables coming from the front of the HP ProCurve 6400cl switch.
Note:
The HP ProCurve 6400cl switch is installed in the rack with its front ports facing toward the rear
of the rack.
Figure 2-2 Cable Management Bracket Orientation (Rear of Rack)
1
5
6
1
2
3
4
7
10 Installing the Cable Management Kit