
ProCurve 6400 CX4 Cable Management Kit Installation Guide (5991-7987)

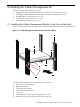
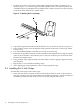


The following list describes the callouts shown in Figure 2-2:
1. HP ProCurve 6400cl switch
2. HP ProCurve 1U rack mount slide rail
3. Thumb screw
4. Rack right column
5. Cable management bracket
6. Top and bottom HP ProCurve 1U slide rail kit mounting screws
7. Direction of view looking in from the rear of the rack
The location of the cable management bracket depends on the rack position occupied by the HP
ProCurve 6400cl switch. Align the cable management bracket with the CX4 connector ports in
the front of the HP ProCurve 6400cl switch. The bracket is made to fit over the thumb screws for
the HP ProCurve 1U rack mount bracket slide rail (see callout 3 in Figure 2-2). The bracket
occupies 1U (1.75 inches) of rack space and is mounted on the rear rack columns of the HP 10000
Series Rack facing outward (see Figure 2-2).
For more information, consult your HP Cluster Platform documentation.
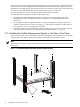
To install the cable management bracket in the rear of the rack, follow these steps:
1. Determine the cable management bracket installation location by aligning the cable
management bracket with the HP ProCurve 6400 switch's front ports (see Figure 2-2).
2. Ensure that the cable management bracket's strap mounting face is lined up with the HP
ProCurve 6400cl switch's CX4 connectors as shown in Figure 2-2. The strap mounting face
radius should face upward so as not to damage the CX4 cables.
3. Fasten the cable management bracket to the rear columns by removing the two top mounting
screws for the HP ProCurve 1U slide rail kit one at a time.
4. Hold the HP ProCurve 6400cl switch while loosening the two bottom HP ProCurve 1U slide
rail kit mounting screws, but do not completely remove the screws.
Important:
Do not completely remove the two bottom HP ProCurve 1U slide rail kit mounting screws
to mount the cable management bracket. Loosen the bottom two mounting screws only
enough to allow the mounting flange of the cable management bracket's bottom U-shaped
holes to rest on the two bottom HP ProCurve 1U slide rail kit mounting screws. Retighten
the two bottom screws as shown in Figure 2-2.
5. Reinstall the two top screws and fasten them to the recommended torque listed in Table 1-1
(page 8).
2.3 Installing the 3.5–Inch Straps
To attach the 3.5 inch straps to the cable management bracket, follow these steps:
2.3 Installing the 3.5–Inch Straps 11