
ProCurve 6400 CX4 Cable Management Kit Installation Guide (5991-7987)


3 Removing the Switch for Servicing
Bring the component to an appropriate state for removal, and put the rack cabinet into a safe
and stable state for component removal. You must ensure that you can reach the component
easily and handle it safely. Remove the unit as follows:
1. Switch off the power supply from the rack's power distribution unit and disconnect the
power cable.
2. Disconnect and remove each network cable until all of the networking ports are unplugged.
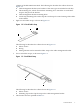
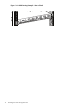
3. Unstrap the cables on the cable management bracket mounted on the front of the rack and
remove the cable management bracket from the front of the rack. When disconnecting the
cables, ensure that you do not bend them more than the recommended bend radius. The
cable specifications are provided in the documentation for your cluster type.
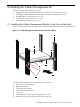
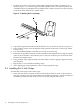
4. Loosen the four thumb screws and slide the HP ProCurve 6400cl switch all the way out from
the front of the rack.
Note:
HP recommends sliding the HP ProCurve 6400cl switch out from the front of the rack. It is
not necessary to remove the rear cable management bracket to slide the switch out from the
front of the rack. Sliding the switch out from the front of the rack allows the CX4 cables to
be supported in the rear cable management bracket straps while the switch is being repaired
or replaced.
15