
Tab Mount Cable Management Bracket Installation Guide


2
Installing the Kit
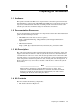
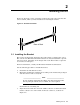
Figure 2-1 shows the correct orientation of the bracket, but it does not show the
server’s rail kit, which you must install before mounting the bracket.
Figure 2-1: Bracket Orientation
Rear of Rack
2.1 Installing the Bracket
The location of the bracket depends on the rack position occupied by the server.
The servers in an HP Cluster Platform solution are always installed in a specific
rack (U) location, depending on the design of the rack. The bracket occupies 1U
(1.75 inches) of rack space.
For more information, consult your HP Cluster Platform documentation.
Use the following pr
oceduretoinstallthebracket.
1. Determine the installation location.
2. Mount the quick-de
ploy rail kit track according to the instructions packaged
with the server’s r
ack accessory kit.
_______________________ Note _______________________
Do not assemble and mount the folding cable management bracket
that is packaged with the server’s rail kit. It is not required.
Each track has a mou
nting tab.
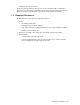
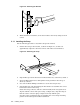
3. Align the bracket with the end of the railkit (callout 1) so that its threaded
inserts (callout 2) are on the inside of the tabs (callout 3), as shown in
Figure 2-2.
Installing the Kit 2-1