
XC3000 Cluster HP XC Interconnect xx3020 Cabinet Kit Installation Guide
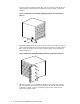
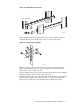

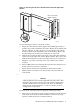
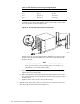

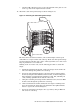
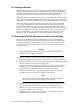

Table 2: Rack Positions for Securing the Right Bracket.
Rack Position Mounting Hole Example, using T=8
T+1 Top (3) 9 Top
T+3 Top (3) 11 Top
T+7 Bottom (1) 15 Bottom
T+9 Bottom (1) 17 Bottom
b. Working from the rear of the rack, insert the interconnect into the rack
and slide it along the tracks until the right bracket makes contact with
the rack column, as shown in Figure 14.
Figure 14: Inserting the Interconnect into the Rack
ZK-2073
Rear of the Rack
M5 x 10 mm
M6 x 16 mm
Ensure that each cage nut aligns with an unthreaded (oval) hole in the
bracket. (You use the threaded holes to attach the cable management
straps in step 10.)
_____________________ Note _____________________
If a cage nut is in the wrong mounting hole, you can remove it
through the oval cut-out in the bracket.
c. Secure the right bracket loosely with four M6 x 16 mm screws. Do not
tighten the screws at this time.
d. The left track has two threaded inserts that align with two holes in the
left (angled) bracket. Secure the bracket to the track by using two M5 x
10 mm screws.
e. Tighten all six of the screws to the specified torque.
8. Working at the front of the rack, you secure the rear of the interconnect by
using the hold-down bracket shown in Figure 15.
10 HP XC Interconnect xx3020 Cabinet Kit Install Guide