
XC3000 Cluster HP XC Interconnect xx3020 Cabinet Kit Installation Guide

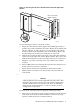
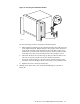

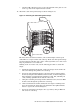

Figure 16: Attaching the Blanking Plate
ZK-2075
Front of the Rack
_______________________ Note _______________________
Before installing the blanking plate, connect a power cable from
the power distribution bars to the power inlet at the rear of the
interconnect. Follow the configuration guidelines for your system
when selecting a power outlet. The guidelines ensure that an
appropriate load is placed on the rack’s power distribution unit and
that the interconnect is connected through a circuit breaker.
Use the following procedure to attach the blanking plate:
a. See Figure 13 in step 6 of this installation procedure, where you
installed the U-nuts on the air duct’s front bracket. Insert three cage nuts
into the back of square mounting holes in the right rack column at the
positions defined in Table 3, where T is the rack position at which the
track is currently mounted.
Table 3: Rack Positions for Securing the Blanking Plate
Rack Position Mounting Hole Example, using T=8
T+2
Bottom (1) 10 Bottom
T+5 Middle (2) 13 Middle
T+8
Top (3) 16 Top
_____________________ Note _____________________
You can also temporarily hold the blanking plate against the
rack columns, so that the three left-hand holes align with the
U-nuts. Then mark the position of the right-hand holes on the
right rack column using a marker pen or tape.
b. Use three M6 x 16 mm screws to secure the left side of the plate to each
U-nut on the air duct’s front bracket.
12 HP XC Interconnect xx3020 Cabinet Kit Install Guide