
XC3000 Cluster HP XC Interconnect xx3020 Cabinet Kit Installation Guide

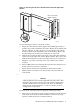
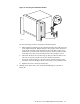


c. Use three M6 x 16 mm screws to secure the right side of the plate to each
of the cage nuts in the right-hand rack column.
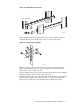
10. Attach the cable management straps as shown in Figure 17.
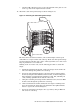
Figure 17: Attaching the Cable Management Straps
ZK-2076
Rear of the Rack
M6 x 16 mm
M5 x 10 mm
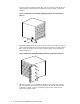
The interconnect chassis has 16 slots, some of which might contain 8-port
cards. There is a 2-port control card at the top. Each cable management strap
provides support for 24 fibre-optic cables. A metal grommet at one end of each
strap is provided for a screw fastener.
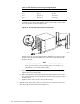
Working at the rear of the rack, use the following procedure to attach the
straps:
a. Install the right-hand straps first. Using four straps, insert an M5 x 10
mm screw through the grommet in each strap.
b. Secure the four right-hand straps to the interconnect’s right mounting
bracket by using the threaded holes in the bracket, as shown in Figure 2.
(The straps line up approximately with the 1st, 5th, 9th, and 12th port
cards, working upward from the bottom of the rack.)
c. Using the remaining four straps in the left-hand location, insert an M6 x
16 mm screw through the grommet in each strap.
d. On the left-hand rack column, identify the four square mounting holes
that correspond to the straps that you installed on the right-hand side.
Insert a cage nut in each mounting hole.
e. Secure the remaining four straps to the cage nuts by using an M6 x 16
mm screw in each strap.
HP XC Interconnect xx3020 Cabinet Kit Install Guide 13