
XC3000 Cluster HP XC Interconnect xx3020 Cabinet Kit Installation Guide


1
HP XC Interconnect xx3020 Cabinet Kit
Install Guide
1 Audience
HP service representatives and other persons trained to install hardware mounting
options and system components in HP 10000-series racks. Such persons are
expected to understand the hazards of working in this environment and to take
suitable precautions to minimize danger to themselves and to others.
2 Documentation Resources
You can download the documentation for components referenced in this installation
guide from the following locations:
• HP Model 10642 Rack:
http://h18004.www1.hp.com/products/servers/proliantstorage/racks
(Select the 10000-series rack and open the
Documentation option on the Web
page menu.)
• HP XC3000 cluster:
http://www.hp.com/techservers/clusters/xc_clusters.html
3 Overview of the Installation Procedure
Complete the following steps to install the HP XC Interconnect xx3020 Cabinet Kit:
1. Verify the kit contents.
2. Orient the kit for installation.
3. Prepare for installation.
4. Gather required resources.
5. Identify the installation location in the rack.
6. Install the kit in the rack.
The installation of a single interconnect should take 30 minutes to complete.
4 Verifying Kit Contents
The kit contains the following components:
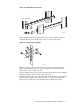
• An air intake duct, which enables the HP XC Interconnect xx3020 Cabinet Kit
cooling fans to draw in air from the front of the rack. Figure 6 identifies
the duct.
• A pair of tracks that support the interconnect and enable you to slide the
interconnect into the rack. Figure 10 identifies the tracks. The tracks are
identical; there is no left-hand or right-hand orientation.
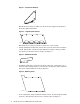
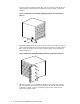
• A pair of bracket retainers, left-hand and right-hand (when viewed from the
rear of the rack). The left—hand bracket is angled, as show in Figure 1.
HP XC Interconnect xx3020 Cabinet Kit Install Guide 1