
XC3000 Cluster HP XC Interconnect xx3020 Cabinet Kit Installation Guide

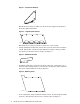
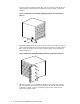
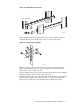


Figure 6: HP XC Interconnect xx3020 Cabinet Kit and Rack Orientation
Interconnect
Rails
Duct
Rear of
the Rack
ZK-2039
Front of the Rack
Air Intake
Duct
Interconnect
The location of the interconnect in the rack depends on the specific configuration
of your XC3000 Cluster. Up to four interconnects might be installed in a single
rack, and their rack positions might vary depending on the configuration rules for
your system. The examples in this installation guide show how an interconnect
is installed at rack position 8.
6 Preparing for Installation
Prepare for installation as follows:
• Ensure that the cluster is shut down and powered off so that you can perform
the installation.
• Remove the rack front and rear doors and side panels for ease of installation.
Verify that the rack is secure and stable enough to work on, and always install
the lowest components first.
• Prepare a suitable work surface, such as a table, on which you can safely stack
the unpacked parts and have room to attach the brackets to the interconnect.
7 Gathering Required Resources
To install the kit, you require the following resources:
• Tools:
- Screwdrivers or bits for a power screwdriver or drill.
P1 (small bit) Phillips (Posidrive or cross-point) is required for the 6/32
x .375 inch machine screws.
P2 (medium bit) Phillips (Posidrive or cross-point) is required for all
other fasteners.
Torx driver or bit size T25.
- Cage nut insertion tool (optional).
- Marker, pencil, or masking tape to identify mount locations.
• Environment:
- A work surface adjacent to the rack.
- A small work platform, stable stepladder, or step stool.
4 HP XC Interconnect xx3020 Cabinet Kit Install Guide