
XC3000 Cluster HP XC Interconnect xx3020 Cabinet Kit Installation Guide


_____________________ Caution ____________________
Always install components into a rack working from the bottom
of the rack upwards. An HP XC3000 interconnect building block
(IBB) rack might contain up to four HP XC Interconnect xx3020
units. The HP XC Interconnect xx3020 weighs approximately
32 kg (70 lb) when fully populated with port cards. Ensure that
you have two or more people on hand to help lift the HP XC
Interconnect xx3020 into its rack position, particularly when
installing the interconnects into the upper part of the rack.
8 Determining the Installation Location
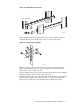
You can install a maximum of four HP XC Interconnect xx3020 units in a single
IBB. In an IBB that contains four interconnects, the tracks are mounted at rack
positions 3, 13, 23, and 33. You mount the duct on the front left rack column. Its
bottom mounting hole aligns with
T+2, where T is the track mounting position. For
example, if the track is mounted at position 3 (the lowest possible location in the
rack) the air duct mounts in the bottom hole at position 5. Each mounting position
provides three mounting holes; bottom, middle, and top.
The actual installation location depends on whether you are replacing an existing
(but defective) interconnect or upgrading an existing system with additional
interconnects. The documentation delivered with your system upgrade contains
the configuration rules that define where each upgrade component is located. You
must follow these rules to ensure that the system’s power and communication
cables can span the appropriate distances between components.
9 Installing the HP XC Interconnect xx3020 Cabinet Kit
Install the HP XC Interconnect xx3020 Cabinet Kit as follows:
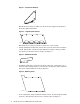
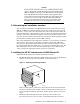
1. The HP XC Interconnect xx3020 is shipped with generic rack mount brackets
that are screwed to the side of its chassis, as shown in Figure 7.
Figure 7: Removing the Existing Brackets
ZK-2042
2
1
Remove both brackets (callout 1) by unscrewing five flat-head countersunk
fasteners at the side of the chassis (callout 2). Discard the brackets; they are
not used in this installation. Retain the original screws, which you reuse in
step 2.
2. Mount the left-hand (angled) retainer bracket to the left side of the
interconnect’s chassis. Use two of the countersunk flat-head screws from
HP XC Interconnect xx3020 Cabinet Kit Install Guide 5