
XC3000 Cluster HP XC Interconnect xx3020 Cabinet Kit Installation Guide

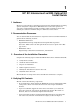
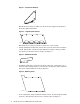
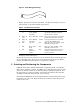
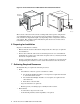
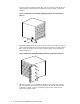
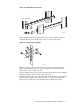


Figure 10: Orientation of the Tracks
ZK-2045
Rear of the Rack
1
Figure 11 shows how the mounting holes on the end of the track (callout 1)
align with the square mounting holes on the face of the rack column.
Figure 11: Inserting the Cage Nuts
8
2
1
3
ZK-2040
Clip two cage nuts (callout 3) into the back of the rack column, using the
square mounting holes shown by callout 2. Repeat this operation for each
track, using a total of eight cage nuts.
Using four M6 x 16 mm screws per track, fasten the tracks to the rack columns
through the holes (callout 1) in the end of each track.
5. Working from the front of the rack, position the air intake duct on the left-hand
track, as shown in Figure 12. Callout 1 shows one of three threaded inserts
that you use to mount the air intake duct to the left-hand rack column.
HP XC Interconnect xx3020 Cabinet Kit Install Guide 7