
XC3000 Cluster Quad Bracket Kit Installation Guide


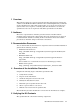
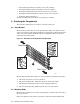

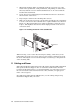

Figure 1-2: Orientation of the Left-Hand Mounting Slide
Front of the Switch
2
1
The following mounting features are referenced in the installation procedure:
1. The cut-out (hole) located at the rear of the mounting slide.
2. The keyhole slots for attaching the slide to the server chassis.
7 Preparing for Installation
No tools are required to install the quad bracket and mounting slides. Prepare a
suitable work surface, such as a table, on which you can safely stack the unpacked
servers and have room to attach the slide mounts. Unpack the four servers and
install any options and upgrades. If factory-installed slide mounts are preinstalled
on the servers, remove these slides and retain them for future use. Stack the
servers on a stable work surface.
_________________________ Note _________________________
Some pressure is required to attach the slide mounts to the side of the
server. Ensure that the work surface is not slippery, or has a raised edge
against which you can rest the server to prevent it from sliding.
Remove the cabinet doors and side panels from the rack for ease of installation.
8 Identifying the Installation Location
The quad bracket occupies 4x1U (7 inches) of cabinet space in the rack. Each 1U
location is numbered 01–42 from the bottom to the top of the rack columns. There
are three mounting holes for each 1U of space in the rack. The lowest of the four
tracks in the quad bracket is the baseline for its installation location. For example,
if you want to mount the quad bracket at the very bottom of the rack, its baseline
will align with position 03 on the rack. The Power Distribution Units (PDUs)
occupy positions 01 and 02.
Quad Bracket Kit Installation Guide 1-3