
XC3000 Cluster Quad Bracket Kit Installation Guide


The quad bracket’s installation location is dependent on the configuration rules
for your XC cluster upgrade bundle. (You can obtain the documentation from
the locations specified in Section 3.) An upgrade bundle consists of a number
of different components, such as servers, Ethernet switches, and cables of
predetermined length. Each component must occupy a specific rack location so that
the inter-component cabling is correct.
For example, an existing cluster compute building block (CBB) contains 20 servers,
and you are upgrading it with 8 additional servers. The first available installation
location for the quad bracket will be at rack position 31. See the cluster upgrade
installation information for the configuration layout and for the correct sequence of
component installation. For applications other than the XC cluster series, follow
the rack location instructions in the documentation supplied with your server.
9 Mounting the Quad Bracket in the Rack
Mount the pair of quad brackets in the rack as follows. The procedure describes
the installation as viewed from the front of the rack.
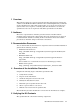
1. Identify the right-hand quad bracket, as shown in Figure 1-1.
2. Align the lowest track in the quad bracket with the correct rack position
(marked on the front column).
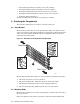
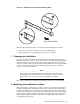
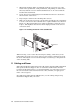
3. Insert the rear mounting tabs through the square mounting holes in the rear
rack column (arrow 1 in Figure 1-3).
4. Align the quad bracket with its corresponding position on the front rack
column so that it is level and square (arrow 2 in Figure 1-3).
5. Push the quad bracket forward against the front column until it snaps into
position and is retained by the snap springs (arrow 3 in Figure 1-3).
1-4 Quad Bracket Kit Installation Guide