
XC3000 Cluster Quad Bracket Kit Installation Guide


5. When both mounting slides are installed, insert the server into one of the
tracks in the quad bracket. Using both hands, and pushing on either side of
the bezel, slide the server in until its thumbscrews are in contact with the
bracket’s threaded inserts.
6. Secure the server by tightening the two thumbscrews that are attached to
the front bezel of the server.
7. Repeat steps 5 and 6 for the remaining three servers.
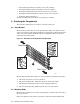
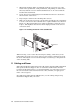
8. Slide each of the four servers into a track in the quad bracket. It is important
to secure each server in the rack with its two captive thumbscrews, shown in
Figure 1-5. The quad bracket has no other mechanism to retain the server
in place. The slightest outward movement might put strain on the server’s
connection cables.
Figure 1-5: Installing the Server in the Quad Bracket
Thumbscrew
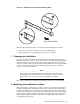
When removing a server (after disconnecting its cabling), ensure that you use
both hands to keep the server level, and to bear its weight as it disengages from
the track. Allowing the server to tilt down might cause damage to the quad rack
or the mounting slide.
11 Cabling and Power
Follow the installation instructions for the XC cluster upgrade bundle with which
this quad rack kit was shipped. (You can obtain the documentation from the
locations specified in Section 1.3). It is important that you connect the servers to
the correct network cables and interconnect cables, and that you apply power
in the correct sequence.
For applications other than the HP XC-series, see the cabling and power-up
instructions shipped with your server.
1-6 Quad Bracket Kit Installation Guide