
XC6000 Cluster Cable Management Basket Installation Guide

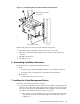
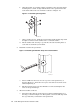

Figure 1-1: Cable Management Tray Basket Detail and Orientation
Rear Rack Columns
View Towards the Rear
of the Rack
xc-bskt-001
3
1
2
4
The following parts are referenced in the installation procedure:
1. The retainer strap, which has a single fastener slot at each end.
2. The cable management basket, which has four fastener slots and holes in
each end.
3. The M6 x 10 mm screw.
4. The M6 cage nut.
6 Assembling Installation Resources
To install the kit, you require the following resources:
• Tools:
- A 6-inch long #2 (medium) Phillips (Posidrive or cross-point) screwdriver
- A marker, pencil, or masking tape to identify the mount position
• Environment:
- A work surface adjacent to the rack
7 Installing the Cable Management Basket
Install the cable management basket as follows:
1. Determine the installation location. The top of the basket is determined by the
position of its retainer strap. The strap mounts at position 27 on the rack (just
below the bottom ports on the HP XC Interconnect xx6020). Use the following
procedure to determine the position of the 10 cage nuts:
a. On each of the rear rack columns, clip a cage nut into the square hole next
to the number 27 on the rack column. This hole is marked as callout 2
on Figure 1-2.
Cable Management Basket Installation Guide 1-3