
XC6000 Cluster Cable Management Basket Installation Guide

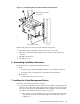
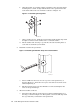

b. Using the basket as a template, hold it against the rack so that its topmost
mounting holes (callout 1) align with the holes next to position 26 on the
rack column. These holes are marked as callout 3 on Figure 1-2.
Figure 1-2: Positioning the Cage Nuts
27
26
xc-bskt-002
1
2
3
c. Using a marker or tape, mark the rack mounting positions that align with
all eight screw holes on the basket (four to each rack column).
d. Put the basket aside and clip a cage nut into the rack mounting holes at
each of the locations that you marked.
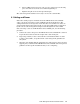
2. Install the retainer strap as follows:
Figure 1-3: Mounting the Retainer Strap on the Rack Columns
xc-bskt-002
a. Insert an M6 x 10 mm screw in each cage nut at rack position 27, as
shown in Figure 1-3. Insert the screw just a few turns to retain the screw
without tightening it.
b. Slip the retainer strap’s cut-out behind the screw head and tighten the
screw to its specified torque.
3. Attach the basket as follows:
a. Insert the basket into the retainer strap so that its folded lip slides over
the strap, as shown in Figure 1-1. The topmost screw holes will align with
the cage nuts that you inserted in rack position 26.
1-4 Cable Management Basket Installation Guide