
Myrinet System Interconnect Guide


5. At the rear o f the rack, disconnect the cables after first ensuring that the
cables are properly labeled for their appropriate ports. This is important if you
are planning to replace a defective interconnect.
Remove the cables from the cable management straps, and route them
carefully out of the way of the interconnect’s removal path.
_______________________ Note _______________________
Observe the maximum bend radius f or cables. Bending the cables
too much can cause damage. radius.
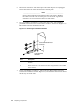
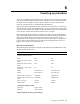
6. Working at the front of the rack, remove the two small screws that secure
the interconnect chassis to the hold-down bracket on the right-hand track
(Figure 5-10).
Figure 5-10: Hold-Down Bracket
ZK-2068
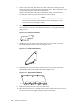
7. Working at the rear of the rack, remove the two screws that secure the
left-hand (angled) bracket to the track (Figure 5-11).
Figure 5-11: Left B racket Retainer
ZK-2046
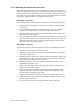
8. Working at the rear of the rack, remove the four screws that secure the
right-hand bracket to the right rack column (Figure 5-12).
Figure 5-12: Right Bracket Retainer
ZK-2067
9. Slide the interconnect out of the rear of the rack.
10. Move the interconnect to a suitable work surface. R etain all screws for reuse.
Use of incorrect screws might damage internal components.
5-8 Replacing components