
HP Cluster Platform Server and Workstation Overview


3.1.4 Installing or Replacing a PCI Card in the HP ProLiant DL145 G2
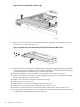
The HP ProLiant DL145 G2 has three PCI expansion slots on the system board. The system
supports up to two expansion boards at a time. Figure 3-11 shows the PCI slots on the HP ProLiant
DL145 G2 system board.
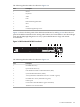
Figure 3-11 HP ProLiant DL145 G2 PCI Expansion Slots
1
2
3
The following table describes the callouts in Figure 3-11.
Table 3-3 HP ProLiant DL145 G2 PCI Slots
CapabilitiesSlotItem
Supports a low profile 64-bit, 133 MHz PCI-X riser board64-bit, 133 MHz PCI-X slot1
Supports a standard height, full-length 64-bit, 133 MHz PCI-X
riser board
64-bit, 133 MHz PCI-X slot2
Supports a full-length PCI Express x16 riser boardPCI Express x16 slot3
When replacing a PCI card in an HP ProLiant DL145 G2, use only HP supported expansion
boards that meet the following specifications:
• PCI or PCI-X compliant
— Connector: 32 or 64 bits wide, 3.3 V
— Speed
◦ PCI board speed: 66 MHz
◦ PCI-X board speed: 100 or 133 MHz
— Form factor: low profile or standard height, full-length boards
• PCI Express x16 compliant (available only when the optional PCI Express riser board is
installed)
To replace a PCI expansion card, follow these steps:
1. Attach a grounding strap to your wrist or ankle and a metal part of the chassis.
2. Press the Power button to power down the server. When the server powers down, the system
power LED turns off.
3. Disconnect the AC power cord, first from the AC outlet and then from the server.
Note:
The front panel Power button does not completely shut off system power. Portions of the
power supply and some internal circuitry remain active until AC power is removed.
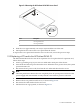
4. Remove the server from the rack, as described in Section 3.1.2.
5. Remove the access panel from the server, as shown in Figure 3-8.
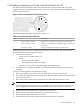
6. Disconnect the cable attached to the PCI card.
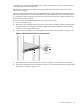
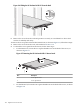
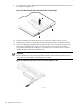
7. Lift and remove the PCI riser board assembly from the chassis as follows:
3.1 HP ProLiant DL145 107