
HP Cluster Platform Server and Workstation Overview


Note:
If the operating system automatically places the server in Standby mode, omit the next step.
3. Press the Power On/Standby button to place the server in Standby mode. When the server
activates Standby power mode, the system power LED changes to amber.
Important:
Pressing the UID button illuminates the blue UID LEDs on the front and rear panels. In a
rack environment, this feature facilitates locating a server when moving between the front
and rear of the rack.
4. Disconnect the power cords. The system is now without power.
5. Disconnect all remaining cables on the server rear panel, including cables extending from
external connectors on expansion boards. Make note of which Ethernet and interconnect
cables are connected to which ports.
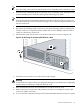
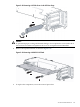
6. Pull down the quick-release levers on each side of the server as shown in Figure 3-40.
Figure 3-40 Removing the ProLiant DL385 G2 from a Rack
1
2
1
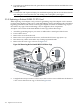
7. Extend the server until the server rail-release latches engage.
Warning!
To reduce the risk of personal injury or equipment damage, be sure that the rack is adequately
stabilized before extending a component from the rack.
8. Press and hold the rail locks, and extend the server until it clears the rack.
9. Remove the server from the rack and position it securely on a workbench or other solid
surface for stability and safety.
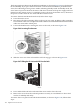
10. To access internal components, lift up on the hood latch handle and remove the access panel.
3.5 HP ProLiant DL385 G2 133