
HP Cluster Platform Server and Workstation Overview


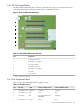


Note:
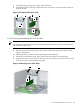
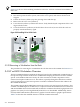
Figure 5-25 shows a PCI card being installed in a PCI slot. A PCI-X card must be installed in a
PCI-X slot.
To install a PCI or PCI-X card, refer to the callouts in Figure 5-25 and follow these steps:
1. Disconnect power from the system, remove the access panel, and remove the PCI card
support.
2. Lift the PCI levers (callout 1) by first pressing down and then up.
3. Remove the PCI slot cover (callout 2).
4. Lower the PCI (callout 3) card into the chassis. Verify that the keyed components of the card
align with the socket.
5. Close the PCI levers (callout 4). If the PCI levers do not close, be sure all of the cards are
properly seated and then try again.
Figure 5-25 Installing PCI or PCI-X Cards
1
1
3
4
4
2
5.3.10 Removing a Workstation from the Rack
The procedure for removing the xw9300 from the rack the same as the xw8200. See Section 5.1.3.
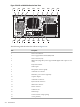
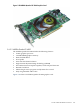
5.4 HP xw9400 Workstation Overview
The HP xw9400 Workstation mechanical design is based on the xw8400 and xw9300 designs. It
incorporates improvements made for the xw8400 while keeping the features from the xw9300
specific to the AMD architecture. Nearly all of the customer-accessible components can be
removed and replaced without a tool. The airflow, especially through the disk drives and PCI
area has been improved, and it incorporates a number of additional features that enhance the
HP xw9400 Workstation.
The xw9400 supports dual AMD Opteron microprocessors, each one having four memory slots
available. The AMD Opteron architecture, in conjunction with the NVIDIA nForce Professional
3600 and NVIDIA nForce Professional 3650, enables the xw9400 to drive dual, high-performance
graphics slots (entry level to High End 3D) at full PCI–e x16 bandwidth. Additionally, the use
of SLI (Scalable Link Interface) between two graphics boards enhances graphics performance.
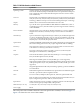
Table 5-12 describes the standard features of the HP xw9400 workstation.
234 Workstations