
HP Cluster Platform Server and Workstation Overview


1. Remove the cover as follows:
a. Loosen the captive thumbscrew on the rear panel. This screw is identified by item 2 in
Table 2-3.
b. Slide the cover approximately 1.25 cm (0.5 in) toward the rear of the unit, then lift the
cover to detach it from the chassis.
c. Place the top cover in a safe place for reinstallation later.
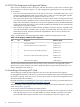
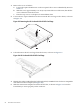
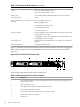
2. Loosen the two captive thumbscrews that secure the PCI card cage to the chassis, as shown
in Figure 2-3.
Figure 2-3 Removing the HP ProLiant DL140 G2 PCI Card Cage
1
1
2
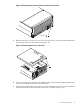
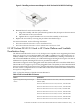
3. Lift and remove the PCI card cage from the chassis, as shown in Figure 2-3.
Figure 2-4 HP ProLiant DL140 G2 PCI Card Cage
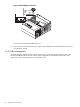
4. Identify the wider standard height, full-length 64-bit/ 133 MHz PCI-X slot that is compatible
with the interconnect adapter (see Figure 2-2).
5. Slide the interconnect adapter board into the PCI slot, as shown in Figure 2-5. Press the
board firmly to seat it properly on the connector.
58 Xeon Processor Servers