
HP Cluster Platform Server and Workstation Overview

2.4.5 Replacing a PCI Card
When replacing a PCI card, you need a grounding strap. The adapter card is sensitive to
electrostatic discharge. Take care to avoid mishandling, which could damage the card. Before
beginning installation, and without removing the adapter card from its antistatic bag, inspect
the product for any signs of obvious damage, such as chipped or loose components.
To replace a PCI card, follow these steps:
1. Attach the grounding strap to your wrist or ankle and to a metal part of the chassis.
2. Power off the server.
3. Remove the server from the rack.
4. Remove the cover from the server and locate the PCI slots.
5. Disconnect any cables connected to any existing expansion boards.
6. Loosen the PCI riser board assembly thumbscrews.
7. Lift the front of the assembly slightly and unseat the riser boards from the PCI riser board
connectors.
Note:
Be sure that all DIMM slot latches are closed to provide adequate clearance before removing
the PCI riser board assembly with a half-length expansion board.
8. Remove the riser card from the PCI connector side of the card.
9. Remove the new PCI adapter from its antistatic plastic bag. Handle the adapter only by the
edges. Do not touch the card-edge connectors.
10. Record the adapter serial number located on the card for future reference.
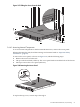
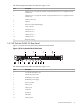
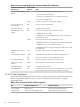
11. Insert the new PCI into the riser card, as shown in Figure 2-19.
Figure 2-19 Inserting the PCI Riser Card
HPTC-0038
Important:
A 64-bit riser card must be used in a 64-bit PCI slot; likewise, a 32-bit riser card must be used
in a 32-bit PCI slot. Otherwise, the PCI interface might not be correctly detected and serious
performance irregularities might result.
12. Insert the riser card into a PCI slot. Handle the interface card gently, preferably by the front
panel or card edges. The front panel of the interface card is the metal plate or molding that
contains two LEDs and the port connector. Be sure the adapter is securely seated.
13. Secure the card in place.
14. Tighten the screws beneath the ports.
15. Replace the exterior cover of the server, and attach the cable between the card and the switch.
16. Power on the server and check that the card is detected.
72 Xeon Processor Servers