
HP Cluster Platform Server and Workstation Overview


1. Power down the server following the steps previously outlined.
2. Disconnect all remaining cables on the server rear panel, including cables extending from
external connectors on expansion boards. Make note of which Ethernet and interconnect
cables are connected to which ports.
3. Loosen the thumbscrews securing the server to the rack.
4. Slide the server out of the rack until the rail locks engage.
5. Press and hold the rail lock and extend the server until it clears the rack.
6. Remove the server from the rack and position it securely on a workbench or other solid
surface for stability and safety.
2.7.9.1 Accessing Internal Components
To access internal components in the HP ProLiant DL380 G5 servers, remove the access panel.
When performing this task, heed the warnings and cautions listed in “Important Safety
Information” (page 23).
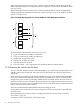
To remove the access panel, as shown in Figure 2-18 (page 71), follow these steps:
1. Remove the server from the rack, as described in Section 2.7.9 (page 96).
2. Lift up on the hood latch. The access panel slides toward the back of the chassis.
3. Pull up to remove the access panel.
To replace the access panel, reverse steps 1 through 3.
2.7.10 Replacing a PCI Card
When replacing a PCI card, you need a grounding strap. The adapter card is sensitive to
electrostatic discharge. Take care to avoid mishandling, which could damage the card. Before
beginning installation, and without removing the adapter card from its antistatic bag, inspect
the product for any signs of obvious damage, such as chipped or loose components.
Caution:
To prevent damage to the server or expansion boards, power down the server and remove all
AC power cords before removing or installing the PCI riser cage.
To replace an HP ProLiant DL380 G5 PCI card in slots 3 through 5, follow these steps:
1. Attach the grounding strap to your wrist or ankle and a metal part of the chassis.
2. Power off the server.
3. Remove the server from the rack.
4. Remove the cover from the server, and locate the PCI riser cage.
5. Disconnect any cables connected to any existing expansion boards.
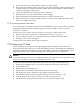
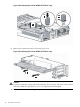
6. Press the blue button to release the black knobs (see callout 1 in Figure 2-42).
7. Turn the black knobs counter clockwise (see callout 2 in Figure 2-42).
8. Lift the PCI riser cage upward and remove it (see callout 3 in Figure 2-42).
2.7 HP ProLiant DL380 G5 97