Memory Modules Document Part Number: 419464-001 January 2007 This guide explains how to replace and upgrade memory in the computer.
Contents Adding or replacing memory modules Adding a memory module to the expansion memory module slot. . . . . . . . . . . . . . . . . . . . . . . . . . . . . . . 2 Upgrading the memory module in the primary memory module slot . . . . . . . . . . . . . . . . . . . . . . . .
Adding or replacing memory modules The computer has 2 memory module compartments. The primary memory module compartment is located under the keyboard. The expansion memory module compartment is located on the bottom of the computer. The memory capacity of the computer can be upgraded by adding a memory module to the vacant expansion memory module slot or by upgrading the existing memory module in the primary memory module slot.
Adding or replacing memory modules Adding a memory module to the expansion memory module slot To add or upgrade a memory module in the expansion memory module slot: is in the Sleep state or in Hibernation, you must ✎ Iffirsttheexitcomputer Sleep or Hibernation before shutdown is possible. 1. Save your work and close all open programs. 2. Click Start, click the arrow next to the Lock button, and then click Shut Down. 3. Close the display. 4. Disconnect all external devices connected to the computer. 5.
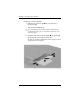
Adding or replacing memory modules 8. Loosen the 2 memory module compartment cover screws 1. 9. Lift the memory module compartment cover 2 away from the computer.
Adding or replacing memory modules 10. Remove a memory module: a. Pull away the retention clips 1 on each side of the memory module. The memory module tilts up. prevent damage to the memory module, hold the memory Ä To module by the edges only. Do not touch the components on the memory module. b. Grasp the edge of the memory module 2 and gently pull the module out of the memory module slot. To protect a memory module after removal, place it in an electrostatic-safe container.
Adding or replacing memory modules 11. Insert a new memory module: a. Align the notched edge 1 of the memory module with the tab in the memory module slot. prevent damage to the memory module, hold the memory Ä To module by the edges only. Do not touch the components on the memory module. b. With the memory module at a 45-degree angle from the surface of the memory module compartment, press the module 2 into the memory module slot until it is seated. c.
Adding or replacing memory modules 12. Align the tabs 1 on the memory module compartment cover with the notches on the computer. 13. Close the cover 2. 14. Tighten the 2 memory module compartment cover screws 3. 15. Replace the battery pack. 16. Reconnect external power and external devices. 17. Turn on the computer. If the computer displays a message indicating that the size or configuration of the memory has changed, press f1 to save the changes.
Adding or replacing memory modules Upgrading the memory module in the primary memory module slot To upgrade a memory module in the primary memory module slot: is in the Sleep state or in Hibernation, you must ✎ Iffirsttheexitcomputer Sleep or Hibernation before shutdown is possible. 1. Save your work and close all open programs. 2. Click Start, click the arrow next to the Lock button, and then click Shut Down. 3. Close the display. 4. Disconnect all external devices connected to the computer. 5.
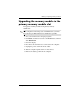
Adding or replacing memory modules 8. Remove 11 screws from the bottom of the computer: the four T8M2.0x18.0 screws 1, the six T8M2.0x9.0 screws 2, and one T8M2.0x5.0 screw 3. screws in the bottom of the computer are of different Ä The lengths. To protect the computer, be sure to keep track of the screws by size and location for safe replacement. 9. Remove the base enclosure cover.
Adding or replacing memory modules 10. Turn the computer display-side up, with the front toward you and open it. 11. Lift up the right rear corner edge 1 and then the left rear corner edge 2 of the keyboard cover to release the rear edge of the cover from the computer. 12. Tilt the keyboard cover up from the front edge 3 to release the front edge of the cover from the computer.
Adding or replacing memory modules 13. To remove the keyboard cover fully, swing the right edge of the cover toward the front of the computer.
Adding or replacing memory modules 14. Turn the computer display-side up and open it completely. 15. Lift the top edge of the keyboard 1 slightly to detach it from the computer. 16. Lift the bottom edge of the keyboard 2 slightly until the pointing stick cable 3 is accessible. pointing stick cable is still attached to its zero insertion Ä The force (ZIF) connector in the computer. To protect the computer, do not lift the keyboard more than about 2 inches (5.08 cm).
Adding or replacing memory modules 17. Pull up on each end of the pointing stick connector collar 1 that holds the pointing stick cable 2 in its connector. 18. Remove the pointing stick cable from the pointing stick connector.
Adding or replacing memory modules 19. Lift the bottom edge of the keyboard up until the keyboard is resting on the display of the computer.
Adding or replacing memory modules 20. Remove the memory module from the memory module slot: a. Pull away the retention clips 1 on each side of the memory module. The memory module tilts up. prevent damage to the memory module, hold the memory Ä To module by the edges only. Do not touch the components on the memory module. b. Grasp the edge of the memory module 2, and gently pull the module out of the memory module slot.
Adding or replacing memory modules 21. Insert the new memory module: a. Align the notched edge 1 of the memory module with the tab in the memory module expansion slot. prevent damage to the memory module, hold the memory Ä To module by the edges only. Do not touch the components on the memory module. b. With the memory module at a 45-degree angle from the surface of the memory module compartment, press the module 2 into the memory module slot until it is seated. c.
Adding or replacing memory modules 22. Replace the pointing stick cable in the zero insertion force (ZIF) pointing stick connector. 23. Press down on the 2 ends of the pointing stick connector collar until the pointing stick cable is reseated.
Adding or replacing memory modules 24. Replace the keyboard. 25. Replace the keyboard cover on the computer by reversing the steps for removing the cover. (Reseat the left side of the cover first, and then reseat the right side. Press along the front edge of the keyboard cover to snap the cover into place.) 26. Turn the computer upside down on a flat surface. 27. Replace the base enclosure cover. 28. Replace the screws on the bottom of the computer.
© Copyright 2007 Hewlett-Packard Development Company, L.P. The information contained herein is subject to change without notice. The only warranties for HP products and services are set forth in the express warranty statements accompanying such products and services. Nothing herein should be construed as constituting an additional warranty. HP shall not be liable for technical or editorial errors or omissions contained herein.