
HP Insight Management 7.3 Installation and Configuration Guide


2 Installing or upgrading HP Insight Management
NOTE: When installing on a Japanese operating system, do not use Japanese characters in the
user name, password, or installation path fields.
Before beginning an installation or upgrade, consider the following:
• Ensure that you have read the HP Insight Management Installation and Upgrade Release Notes
available at: http://www.hp.com/go/insightmanagement/docs, to gather information on
installation or upgrade issues.
• Ensure that you have read the prerequisites required for installing HP Insight Control server
provisioning. The prerequisites are available in the HP Insight Control Server Provisioning 7.2
Update 2 Installation Guide at http://www.hp.com/go/insightcontrol/docs
• Be sure that maintenance activities do not reboot the system during installation.
• For help information during the installation process, click the ? icon.
• Use an ISO mounting utility to load both DVDs.
• To run the installation from hard disk drives, copy the contents of the HP Insight Management
DVDs to different directories on the hard disk.
• Because the installation process requires a reboot for completion:
If you plan to install from a shared network drive, map the network drive and select the
reconnect at logon option. You cannot install directly from a shared drive using UNC.
◦
◦ If you install directly from the DVD, do not remove the DVD from the drive until the
installation completes.
◦ If you are using an ISO mounting utility, select the option to reconnect the drives after
reboot (Automount last image).
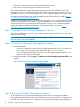
• Configure Internet Explorer to show pictures (default setting) before running the Installer. Select
Tools→Internet Options, select the Advanced tab, and then in the Multimedia section, select
Show pictures.
• To determine which screens Installer displays during your specific installation, based on whether
you are performing a new installation or an upgrade, see the HP Insight Management
Preinstallation Worksheet.
Pre-upgrade steps
The following sections are applicable in a scenario where HP Matrix Operating Environment
components are installed on a CMS.
Validating the CMS
To validate the CMS:
• Create and deploy both physical and virtual logical servers from Matrix OE visualization.
• Create and deploy both physical and virtual templates from Matrix infrastructure orchestration.
Verifying the Matrix Operating Environment services
Scan for Java out-of-memory issues
Scan for possible Java out-of-memory messages issued by the Matrix Operating Environment
services. Search for the OutOfMemoryError string in each of the following log files:
Pre-upgrade steps 11