
HP Insight Virtualization Manager with Logical Server Management 6.1 User Guide

Each portability group contains one predefined storage pool. You create, manage, and modify
storage pool entries using the Modify→Logical Server Storage Pools... menu selection to
display the Manage Storag e Pool screen. You can also create a storage pool entry when you
create a logical server by inserting the newly created storage entry into the storage pool.
Insight Dynamics allocates enough server WWNs so that each logical server that shares a storage
definition is assigned a unique server WWN. The number of allocated server WWNs is determined
by the Maximum Number of Sharers. This is useful in a clustered environment, in which each
system within the cluster has access to the same storage volumes. Any system that shares storage
should have a shared distributed lock management system in place to coordinate LUN access.
A logical server can be associated with multiple storage pool entries. Multiple logical servers
can share the same storage pool entry.
You can configure catalog storage using HP Storage Provisioning Manager. You can then
specifying catalog storage options on the Storage Pool Entry: SAN screen. See “Storage
Provisioning Manager” (page 83) for more information.
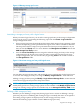
To create a storage pool entry before or after you create a logical server, use the Modify→Logical
Server Storage Pools... menu selection and perform the following steps.
1. Select a Por tability Group from the drop-down menu, or select ALL to view all storage pool
entries. The drop-down menu contains a list of portability groups (Virtual Connect domain
groups and hypervisors) discovered in the environment. If only one portability group exists
in the environment, it is displayed by default, and ALL is not listed in the drop-down menu.
Use the Manage Portability Groups screen to create or modify a portability group.
NOTE: You must select a portability group (other than ALL) before you can create a new
storage pool entry. The storage pool entry that you create will be usable by logical servers
in the specified portability group.
2. Optional: Select values from the Filter Options drop-down menus to display only the
storage pool entries that are relevant to your environment.
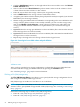
3. Optional: Press Get/Refresh Pool Entries to display existing storage pool entries. Use the
View Modify and Remove buttons to manipulate the entries.
If more than one user attempts to modify the same storage pool entry at the same time, the
Modify and Remove buttons are not displayed for the second and subsequent users.
If you select a storage pool entry to be removed, a confirmation screen is displayed.
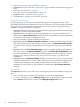
4. Click Manage Tags to display the Manage Storage Tags screen, where you can create a
new storage tag. This tag will then be included in the Tag Filter drop-down menu. You
associate a tag with a storage pool entry by selecting it in the Tag List table on the Storage
Pool Entry: SAN screen.
5. Select a Storage Type from the drop-down menu. The available Storage Types depend on
the Portability Group you select.
6. Press the Add Entry button to create a new storage pool entry.
When you add a storage pool entry, or select a storage pool entry to view or modify, the
Storage Pool Entry: SAN screen is displayed.
76 Defining storage for logical servers