
HP StorageWorks 6Gb SAS disk enclosures getting started instructions (504225-002, November 2009)

Step 3: Develop a plan
Before installing the disk enclosure, read the disk enclosure user guide
to learn about installation, cabling, and configuration procedures. While
reading the guide, develop a plan for your installation.
If you do not have sufficient network and storage management experience
to successfully install this product, HP can install it for you. For more
information, see http://www.hp.com/go/services. Under the Products
& Services banner, select Infrastructure Services, and then click Network
Storage Services.
Step 4: Learn about the disk enclosure
Two 6Gb SAS disk enclosure models are available:
• Large Form Factor disk drive model
• Small Form Factor disk drive model
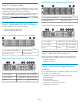
Large Form Factor enclosure front features
3. UID push button1. Left rack-mounting thumbscrew
4. Enclosure LEDs2. Disk drive in bay 6
Large Form Factor enclosure rear features
7. Rear UID button4. I/O module A1. Power supply 2
8. Enclosure LEDs5. I/O module B2. Power supply 1
9. Power button6. Fan 23. Fan 1
Small Form Factor enclosure front features
3. UID push button1. Left rack-mounting thumbscrew
4. Enclosure LEDs2. Disk drive in bay 6
Small Form Factor enclosure rear features
7. Rear UID button4. I/O module A1. Power supply 2
8. Enclosure LEDs5. I/O module B2. Power supply 1
9. Power button6. Fan 23. Fan 1
Step 5: Rack the disk enclosure
The HP 2U Rack Rail Kit installation instructions (shipped with the rail
kit) details the process of racking a disk enclosure. Sections include:
• Installation guidelines
• Installation procedures
Step 6: Install and configure the disk
enclosure
The user guide details the process of installing, cabling, and configuring
the disk enclosures. Key tasks include:
• Preparing the network (installing the 6Gb SAS controller)
• Installing hard drives
• Connecting cables
• Powering on the disk enclosure
• Verifying the operating status of the devices
• Configuring the disk enclosure
Page 2