
HP StorageWorks Small Form Factor Disk Enclosure Backplane replacement instructions (504220-004, February 2010)

Removing the backplane
1. Schedule a maintenance window.
2. Stop all I/O to the enclosure.
3. Power down the enclosure by pressing and holding the On/Standby
button on the rear of disk enclosure, until the system power LED
changes from green to amber.
4. Remove all cabling from the rear of the enclosure. Ensure all cabling
is marked to facilitate re-cabling later.
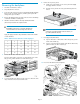
5. Label the disk drives with the drive bay identification labels
(5697-0279) included in the replacement kit.
CAUTION:
Reinstalling a disk drive in a drive bay other than the
one from which it was removed may cause data loss.
Apply the appropriate drive bay identification label to the handle
of each disk drive.
Table 1 Small form factor disk enclosure drive bay layout
21161161
22171272
23181383
24191494
252015105
6. Remove all disk drives from the enclosure.
Press the release button on the lever (1) and rotate the lever to the
left (2). Then, pull the disk drive out of the drive bay (3).
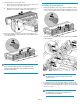
7. Loosen the thumbscrews that secure the enclosure to the front of the
rack, and remove the enclosure from the rack.
8. Remove the top access panel.
a. Lift the access panel latch (1). The access panel will slightly
disengage from the enclosure.
b. Slide the access panel to the rear (2) and lift away from the
chassis.
NOTE:
A Torx tool is provided inside the enclosure chassis, on
top of the I/O module housing.
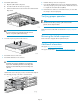
9. Disengage both I/O modules.
a. Squeeze the button on the bottom of the locking lever (1) and
rotate out the handle (2).
b. Position one hand under the module, and with the other hand,
pull the module out of the enclosure (3).
10. Disconnect all cables from the backplane.
Page 2