HP StorageWorks D2D Backup System Instructions for installing disks in a replacement HP D2D Backup System Part number: EH923-90902, Rev B Revised second edition: September 2007
Legal and notice information © Copyright 2007 Hewlett-Packard Development Company, L.P. Hewlett-Packard Company makes no warranty of any kind with regard to this material, including, but not limited to, the implied warranties of merchantability and fitness for a particular purpose. Hewlett-Packard shall not be liable for errors contained herein or for incidental or consequential damages in connection with the furnishing, performance, or use of this material.
1 Installing a replacement HP D2D Backup System Introduction The only functional parts that can be replaced in the HP D2D Backup System Backup System are the hard disks and optional internal tape drive with HBA. If the unit fails for any other reason than hard disk failure and it is still under warranty, a replacement HP D2D Backup System without hard disk drives or internal tape drive and HBA will be supplied.
Electrostatic discharge information ESD can damage static-sensitive devices or microcircuit. Proper packaging and grounding techniques are necessary precautions to prevent damage. To prevent electrostatic damage, observe the following precautions: • Transport products in static-safe containers such as conductive tubes, bags, or boxes. • Keep electrostatic-sensitive parts in their containers until they arrive at static-free stations. • Cover workstations with approved static-dissipating material.
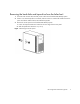
Removing the hard disks and tape drive from the failed unit 1. Disconnect the network cable and the power cord from the failed HP D2D Backup System. 2. If there is an external tape drive connected, make sure that it is switched off and disconnect the power and device cables from the HP D2D Backup System. 3. Remove the access panel on the failed HP D2D Backup System. 1. Loosen the captive thumbscrew located on the rear edge of the access panel. 2. Slide the panel back about 2.5 cm (1.0 in).
4. Remove the front bezel. 1. Press in on the two bottom tabs on the side of the bezel so that they release from the chassis. 2. Press in on the upper tab on the side of the bezel so that it releases from the chassis. The bezel will rotate out slightly. 3. Pull the bezel away from the front panel. Figure 2 Removing the front bezel 5. Remove the cover that secures the drives so that you can remove the hard disk drives. 1. Remove the screw. 2. Pull the cover up and away from the drives.
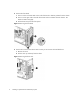
6. Observing normal anti-static precautions, remove the hard disks. 1. Disconnect the power and data cables from the back of each installed drive. 2. A drive latch with release tabs secures the hard drives in the drive bay. Lift the release tab on the drive latch. 3. Slide the hard drive out from the front of the drive bay.
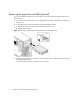
Removing the tape drive and HBA (optional) If you have connected a tape drive to the HP D2D, you must also remove the HBA and disconnect the tape drive. 1. If the drive is an external model, you have already disconnected the cables before removing the access panel. 2. Internal tape drives must be removed from the HP D2D Backup System. 1. Release the catch on the device bay and slide the tape drive out. 2. Disconnect the cables. Figure 5 Removing an internal tape drive (example shows a SCSI tape drive) 3.
2. Remove the slot cover retainer. Figure 6 Removing the slot cover retainer 4. Remove the HBA from the top PCI slot.
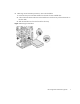
Installing the hard disks in the replacement unit 1. Remove the access cover, front bezel and drive cover from the replacement unit, as described in steps 2 to 4 of ”Removing the hard disks and tape drive from the failed unit” on page 5. 2. Observing normal anti-static precautions, install the disks you have just removed in the replacement unit. The disks may be installed in any order. 1. Slide each hard disk drive into the appropriate bay until it clicks into place. 2.
3. Plug in the SATA cable. When the drives are re-inserted it is important to ensure that the cables align to the SATA slots correctly, as illustrated below. The drive in the lowest slot (HDD1) must be connected to the SATA cable plugged into port 1 (SATA1); the next drive up, HDD2, is connected to SATA2, and so on. Figure 9 Aligning the SATA cables Power Supply HDD 4 HDD 3 HDD 2 HDD 1 System Board SATA3 SATA2 SATA4 SATA1 3. When you have installed all four drives, replace the drive cover. 1.
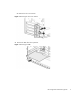
Installing an HBA and tape drive 1. If you removed an HBA, re-install it now. The HBA is required if you wish to connect to an internal or external tape drive. It is always installed in the top PCI slot. 1. Undo the retaining screw on the PCI slot cover retainer on the replacement HP D2D Backup System. 2. Remove the slot cover retainer.
2. Remove the cover from the top expansion slot. Figure 12 Removing the top expansion slot cover IMPORTANT: It may be necessary to temporarily remove the slot cover next to the slot in which you are installing the HBA. 3. Install the HBA in the top PCI slot.
4. Secure the PCI slot. 1. Reinstall the slot cover retainer. 2. Secure the cover with the screw that you removed earlier. Figure 14 Replacing the PCI slot cover 5. If you removed an internal tape drive, re-install it now. 1. Access the removable media cage. 2. Remove the filler panel.
6. Install the tape drive. 1. Slide the tape drive most of the way into the device bay. 2. Attach a spare power cable from the server’s internal power supply to the power connector on the tape drive. Connect the device cable (SCSI or SAS) to the appropriate ports on the HBA and tape drive. Figure 16 Installing an internal tape drive (example shows a SCSI tape drive) 7. Slide the tape drive fully into the bay until it is seated securely. 8.
Replacing the bezel and access panel 1. Replace the bezel. 1. Insert the two hooks on the right side of the bezel into the rectangular holes on the chassis. 2. Rotate the bezel into place so that the three tabs on the left side of the bezel snap into the slots on the chassis. Figure 18 Replacing the bezel (no tape drive installed) 2. Replace the access panel. 1. Use two hands to place the access panel flat against the chassis, the back of the access panel extending about 2.5 cm (1.
3. Reconnect the network cable and the power cord. The HP D2D Backup System is now ready to use and can be accessed from the host machine. All settings are preserved for autoloaders, cartridges and network. NOTE: The only difference between the new unit and the replaced unit is that, if the unit is reset at any point, it will revert to a default network name based on the serial number of the new unit rather than the original. 4. Reconnect any external tape drives, as required. 5.