
HP StorageWorks D2D Backup System Instructions for Installing Disks in a Replacement (EH923-90902, September 2007)


HP StorageWorks D2D Backup System 11
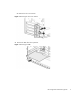
3. Plug in the SATA cable.
When the drives are re-inserted it is important to ensure that the cables align to the SATA slots
correctly, as illustrated below. The drive in the lowest slot (HDD1) must be connected to the SATA
cable plugged into port 1 (SATA1); the next drive up, HDD2, is connected to SATA2, and so on.
Figure 9 Aligning the SATA cables
3. When you have installed all four drives, replace the drive cover.
1. Replace the cover.
2. Use the screw removed earlier to secure it.
Figure 10 Replacing the drive cover
4. If you are attaching a tape drive, read ”Installing an HBA and tape drive” below. If you are not
attaching a tape drive, go to ”Replacing the bezel and access panel” on page 16.
Power
Supply
System Board
HDD 4
HDD 3
HDD 2
HDD 1
SATA4
SATA3
SATA2
SATA1