HP StoreOnce 4900 (44TB) and (60TB) Capacity Expansion Kit Installation Instructions Abstract This document explains how to install the HP StoreOnce 4900 (44TB) and (60TB) Capacity Expansion Kit, apply the new license, and add the new storage to the existing system. It is intended for system administrators familiar with HP StoreOnce 4900 Backup systems.
© Copyright 2013 Hewlett-Packard Development Company, L.P. The information contained herein is subject to change without notice. The only warranties for HP products and services are set forth in the express warranty statements accompanying such products and services. Nothing herein should be construed as constituting an additional warranty. HP shall not be liable for technical or editorial errors or omissions contained herein.
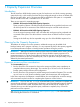
Contents 1 Capacity Expansion Overview.....................................................................4 Introduction..............................................................................................................................4 Planning for the Capacity Expansion...........................................................................................4 Expansion process and time considerations.............................................................................4 Rack warnings..
1 Capacity Expansion Overview Introduction The HP StoreOnce 4900 Backup system consists of a head server unit (which contains operating system disks only), a disk enclosure with 44 TB of pre-configured storage on eleven 4 TB hard disks plus four hot spare disks, and a 1U supporting shelf to install below the system. It is compatible with HP standard racks and is scalable from 11 to 140 disks.
Rack warnings For detailed safety information, refer to the rack documentation and the Safety Guide provided with the product. WARNING! To reduce the risk of personal injury or damage to the equipment, be sure that: • The leveling jacks are extended to the floor. • The full weight of the rack rests on the leveling jacks. • The stabilizing feet are attached to the rack if it is a single-rack installation. • The racks are coupled together in multiple-rack installations.
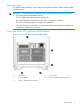
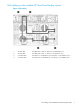
Rear view of the HP StoreOnce 4900 Backup Figure 2 Rear view of the head server 1. RAID card 1, port 2, connects to Drawer 2, IO Module B Port 2 in the first disk enclosure 2. RAID card 1, port 1, connects to Drawer 1, IO Module A Port 1 in the first disk enclosure 3. RAID card 2, port 2, connects to Drawer 2, IO Module B Port 2 in the second disk enclosure 4. RAID card 2, port 1, connects to Drawer 1, IO Module A Port 1 in the second disk enclosure Figure 3 Rear view of the disk enclosure 6 1.
SAS cabling on the installed HP StoreOnce Backup system Figure 4 SAS cabling 1. 2m SAS cable From RAID card 1, port 2 to Drawer 2, I/O Module B, Port 2 2. 2m SAS cable From RAID card 1, port 1 to Drawer 1, I/O Module A, Port 1 3. 0.5m SAS cable From Drawer 1, I/O Module A, Port 2 to Drawer 2, I/O Module A, Port 1 4. 0.
2 Installing the HP StoreOnce 4900 44TB Capacity Expansion One disk enclosure, containing 11 disks of pre-configured storage and 4 hot spare disks, is supplied with the product and is connected at installation. See the HP StoreOnce 4900 Backup Installation and Configuration Guide for details. This chapter describes how to install additional HP StoreOnce 4900 44TB Capacity Expansion kits, which contain eleven 4TB disks, into the disk enclosure.
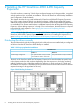
Figure 6 Disk labeling for drawer 2 Table 2 Populating disk bays with Capacity Expansion kits Drawer 1 Drawer 2 + Expansion kit 1 Do not change Add eleven disks to slots 23-33 + Expansion kit 2 Add eleven disks to slots 12-22 Do not change + Expansion kit 3 Do not change Add eleven disks to slots 12-22 + Expansion kit 4 Add eleven disks to slots 1-11 Do not change + Expansion kit 5 Do not change Add eleven disks to slots 1-11 Important Safety information CAUTION: Use extreme caution when i
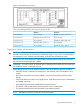
To install the drives 1. Use the StoreOnce User Interface to check what drives are already installed in the disk enclosure. To find out what disks are installed in drawer 1, expand the Hardware tree as follows: Hardware — Storage Cluster 1— Drive Enclosures — Sub Enclosure (Drawer 1) — Drives A list of installed drives is displayed with their disk bay locations. In the following example only the base storage configuration has been installed in Drawer 1. 2.
3. 4. Having determined what disks are already installed, use the label on the disk enclosure to determine which drawer in the disk enclosure should be populated with the set of additional 11 disks. See (page 8). In our example, we have established that this is Expansion #1, so the additional disks will go into drawer 2. Open the hard drive drawer for drawer 2. Pull the handle up (1) and out (2) to extend the drawer (3).
5. Pinch in the levers (1) and remove the hard drive blank (2). Figure 8 Removing the disk blank 6. Press the button (1) to release the carrier handle (2). Insert the hard drive (3) and close the carrier handle (4).
7. Repeat steps 4 to 6 until all eleven disks have been installed. Close the hard drive drawer. You will hear it click into place when it is securely closed. The fans will return to normal speed when both drawers are properly closed. WARNING! Pinch hazard—Keep hands out of front and rear of chassis when closing hard drive drawers. CAUTION: To prevent improper cooling and thermal damage, do not operate the disk enclosure for an extended period of time with the drawer open.
3 Installing and cabling the HP StoreOnce 4900 60TB Capacity Expansion Always refer to your rack documentation and to the Safety Guide and the Installation and Configuration Guide on the HP StoreOnce Backup CD for detailed instructions, including important safety information, about installing units within the rack. This chapter describes how to install the HP StoreOnce 4900 60TB Capacity Expansion.
Figure 10 Installing the rails 4. 5. Repeat the procedure for the right rack rail. Insert the eight locking nuts into the rack; two on each column. These will be used to secure the thumbscrews on the front of the disk enclosure and the mounting brackets that will be attached to the rear of the disk enclosure. To locate the correct position for the locking nuts, count up 4U from the location of the rails (1). The nuts go either side of the +4U position on each rack column (2).
Installing the disk enclosure The base storage disks should be left in the disk enclosure, but do not add any further expansion disks (if purchased) until the second disk enclosure has been installed. • Drawer one (left): Two spare hot disks in bays 34 and 35 and eleven disks in bays 23-33 • 1. Drawer two (right): Two spare hot disks in bays 34 and 35 Holding the handles (1), lift the disk enclosure onto the rack and push it into position (2). Tighten the thumbscrews (3) to secure the unit to the rack.
2. Attach the retaining brackets (1) to either side of the rear of the disk enclosure and secure them to the rack. Figure 13 Attaching the retaining brackets Cabling the second disk enclosure The cabling for the second disk enclosure is identical to the cabling for the first disk enclosure, except it is connected to the second RAID card in slot 4. NOTE: 1. 2. The system will not boot if the SAS cabling is incorrect.
Figure 14 Cabling the second disk enclosure 3. 18 If you have purchased additional HP StoreOnce 44TB Capacity Expansion kits for the second enclosure at the same time as the HP StoreOnce 60TB Capacity Expansion kit, install the sets of 11 disks in exactly the same sequence as described in Installing the HP StoreOnce 44TB Capacity Expansion kit (page 8).
4 Applying the License and Completing the RAID Expansion IMPORTANT: Please note that there is a different license for the HP StoreOnce 44TB and the HP StoreOnce 60TB Capacity Expansion. When adding expansion 1 through 5 for each enclosure, the 44TB license is required. When adding the second disk enclosure, the 60TB license is required. Obtaining the license The Capacity Expansion Kit includes a license entitlement certificate.
3. If you save the LTU as a file, sftp it into the HP Backup system's repository directory. • Using Linux sftp Admin@ cd repository put .dat exit • Using a Windows sftp client Ensure the File Protocol is set to SFTP, not SCP. Login as Admin. Copy .dat to repository. Applying the license IMPORTANT: When connecting multiple capacity expansion kits to an HP StoreOnce Backup system, you must add all licenses before expanding the capacity of the HP StoreOnce Backup system.
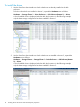
Hardware — Storage Clusters — Storage Cluster 2 — Pool (C4_P1) if a second disk enclosure is installed. NOTE: When you expand capacity, additional pools are created for each set of disks. As there is a separate Storage Cluster for each disk enclosure and associated RAID controller, the pools under Storage Cluster 1 are expanded first. This is the first disk enclosure that is attached to the RAID card in PCI slot 1 and the pools are identified from Pool (C1_P1) to Pool (C1_P6).
Set 1 Formatted 34,876.99GB, Discovered 10,466.40GB to be added # 3. After the LUNs have been created, parity initialization starts. This can take up to 10 hours to complete, see Planning for the Capacity Expansion (page 4). Log on to the StoreOnce User Interface to check the status of this process. You need to check the Pools and Volumes information for each storage cluster. There are up to 6 pools for each storage cluster.
# # hardware show storage status Storage Set Status —----—----–—------–– Set 1 Formatted 34,876.99GB, Adding 37,134.57GB... # # system show status Storage Set —----—----–—--Set Status ----–– Formatted 34,876.99GB, Adding 37,134.57GB... Service Sets Status Notes ------------ ------ ----Set 1 Running # 7. Once the storage is available, performance will return to normal as long as parity initialization was allowed to complete before the hardware add storage command was run.
5 Support and other resources Contacting HP For worldwide technical support information, see the HP support website: http://www.hp.
Typographic conventions Table 3 Document conventions Convention Element Blue text: Table 3 (page 25) Cross-reference links Blue, bold, underlined text email addresses Blue, underlined text: http://www.hp.
6 Documentation feedback HP is committed to providing documentation that meets your needs. To help us improve the documentation, send any errors, suggestions, or comments to Documentation Feedback (docsfeedback@hp.com). Include the document title and part number, version number, or the URL when submitting your feedback.