HP StoreOnce 4500/4700 (24TB) and 4500 (48TB) Capacity Upgrade Kit Installation Instructions Abstract This document explains how to install the HP StoreOnce 4500/4700 (24TB) and 4500 (48TB) Capacity Upgrade Kits, apply the new licenses, and add the new storage to the existing system. It is intended for system administrators familiar with HP StoreOnce 4700 and 4500 Backup systems.
© Copyright 2014 Hewlett-Packard Development Company, L.P. The information contained herein is subject to change without notice. The only warranties for HP products and services are set forth in the express warranty statements accompanying such products and services. Nothing herein should be construed as constituting an additional warranty. HP shall not be liable for technical or editorial errors or omissions contained herein.
Contents 1 Capacity Upgrade......................................................................................4 Introduction..............................................................................................................................4 Planning for the Capacity Upgrade.............................................................................................4 Overview of the Upgrade process..........................................................................................
1 Capacity Upgrade Introduction The HP StoreOnce 4500/4700 Capacity Upgrade Kits increase the storage capacity of your HP StoreOnce Backup system. The following 12–disk expansion kits are available.
. 6. Make sure you have both the HP entitlement order number (supplied with the Upgrade Kit) and the HP StoreOnce serial number (found on the label on the top of the StoreOnce system head). Obtain a License To Use (LTU) from the HP Licensing website, see “Adding the License” (page 11). If you are installing several upgrade kits be sure to obtain all LTUs before step 6.
2 Installing and Connecting the Upgrade Kit Installing the Rails The Upgrade Kit should be installed directly below or above the HP StoreOnce Backup system (or previously installed Upgrade Kits). When adding multiple Upgrade Kits to an HP StoreOnce 4700 Backup system, it is recommended to distribute them evenly above and below the head unit. The HP 2U Rack Rail Kit installation instructions (shipped with the rail kit) details the process of racking a disk enclosure.
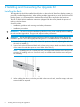
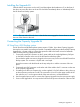
Installing the Upgrade Kit Slide the device into position on the rails (1) and then tighten the thumbscrews (2) on the front of the device to secure the device to the rack. It should be immediately above or immediately below the HP StoreOnce Backup system. NOTE: The rear ends of the rails have a bracket that must engage the device chassis to secure the rear of the chassis to the rails.
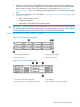
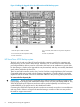
Figure 3 Cabling the Upgrade Kit to the HP StoreOnce 4500 Backup system 1. HD SAS port on RAID controller 2. P1 connector (from head unit or previous expansion shelf) 3. P2 connector (to next expansion shelf) 4. Power on/off button 5. Power connectors HP StoreOnce 4700 Backup system The disks in the head unit of the HP StoreOnce Backup system are used for the operating and filesystem; they are not used for data storage.
1. Connect the square HD connector on the 2–meter cable to the single high-density SAS port on the RAID controller in slot 1 on the rear of the HP StoreOnce Backup system. Ensure that the cable connector is plugged in the correct way on the rear of the HP StoreOnce Backup system. This connector is square and is not keyed. Insert the connector with the blue removed tab at the top and push in until the connector clicks into place. 2. 3. 4.
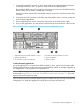
Figure 5 Adding seven Upgrade Kits to the HP 4700 Backup system 1. Power connectors 2. Square HD SAS port on RAID controller in slot 1 3. Square HD SAS port on RAID controller in slot 4 4. P1 connector (on I/O-A mini-SAS port) 5. P2 connector (on I/O-A mini-SAS port), daisy chains to 6.
3 Applying the License and Completing the RAID Expansion Applying the License The Upgrade Kit includes a license entitlement certificate. This is a paper document that contains all the information you need to obtain your unique LTU (License to Use) key. You can obtain the key from the HP Webware site by connecting to the web address specified on the certificate and following the instructions on the web. (Users without Internet access may use the contact numbers provided with the entitlement certificate.
2. If you save the LTU as a file, sftp it into the HP Backup system's repository directory. • Using Linux sftp Admin@ cd repository put .dat exit • Using a Windows sftp client Ensure the File Protocol is set to SFTP, not SCP. Login as Admin. Copy .dat to repository. 3. Check that the LTU is stored within the repository using StoreOnce CLI command: system show repository. nl Look for the .dat file. 4.
1. The easiest way to view the newly added storage enclosure is to log on to the StoreOnce GUI and look at the Hardware tree. Select the Hardware — Drive Enclosure page for the expansion shelf (not the one for the head unit). 2. 3. The hardware tree on the StoreOnce GUI also shows existing Pools and Volumes. To discover the newly attached storage and create a new Logical Unit (LUN) on this storage log on to the StoreOnce CLI and use the StoreOnce CLI command: hardware discover storage 4.
6. Once the discovery process is complete, run the following command in order to format the storage LUN with file system segments: hardware add storage This command will expand the filesystem to use the storage. The process can take a long time to complete and the new capacity will not be available until it is finished. IMPORTANT: It is recommended that at this stage the user waits until Parity initialization is complete for all discovered enclosures before running the hardware add storage command.
Troubleshooting Discover storage fails The hardware discover storage command will fail if: • A previous discover storage command is already running. • There is no storage to be added. • There are insufficient expansion licenses applied to allow the entire expansion to complete (in this case, no expansion will take place until sufficient licenses are present for all added storage). • There are any “foreign” LUNs already present on the attached storage.
4 Documentation feedback HP is committed to providing documentation that meets your needs. To help us improve the documentation, send any errors, suggestions, or comments to Documentation Feedback (docsfeedback@hp.com). Include the document title and part number, version number, or the URL when submitting your feedback.
A Regulatory information For important safety, environmental, and regulatory information, see Safety and Compliance Information for Server, Storage, Power, Networking, and Rack Products, available at http:// www.hp.com/support/Safety-Compliance-EnterpriseProducts. Belarus Kazakhstan Russia marking Manufacturer and Local Representative Information Manufacturer’s information: • Hewlett-Packard Company, 3000 Hanover Street, Palo Alto, California 94304, U.S.
HP Enterprise Servers http://www.hp.com/support/EnterpriseServers-Warranties HP Storage Products http://www.hp.com/support/Storage-Warranties HP Networking Products http://www.hp.