
HP StoreOnce 4500 and 4700 Capacity Upgrade Booklet


2 Installing and Connecting the Upgrade Kit
Installing the Rails
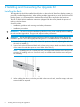
The Upgrade Kit should be installed directly below or above the HP StoreOnce Backup system (or
previously installed Upgrade Kits). When adding multiple Upgrade Kits to an HP StoreOnce 4700
Backup system, it is recommended to distribute them evenly above and below the head unit.
The HP 2U Rack Rail Kit installation instructions (shipped with the rail kit) details the process of
racking a disk enclosure.
Sections include:
• Installation guidelines with warnings and safety information
• Installation procedures
IMPORTANT: Be sure to read the installation guidelines on the poster carefully before installing
the rails and the Upgrade Kit. They provide important safety information.
WARNING! Ensure that sufficient personnel are on hand to support the product(s) during the
installation process. Use of the appropriate lifting device is recommended as an installation aid.
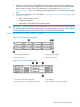
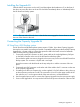
1. Position left and right rack rails at the desired 'U' position in the rack, adjusting the rails to fit
the rack, as needed (1).
2. Secure rack rails to the front and back rack columns using screws. Make sure that the shoulders
of the screws fit inside the square or round holes of the rack (2).
NOTE: If installing rails in a square hole rack, use larger-sized shoulder screws and pins for
mounting. If installing rails in a round hole rack, use smaller-sized shoulder screws and pins
for mounting.
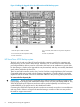
3. When cabling the device, use holes provided in the rear rack rails, install tie wraps, and route
external cable as required.
6 Installing and Connecting the Upgrade Kit